  a C# learning space
|
Buy me a cup of coffee?
|
Painting the Board
Here is where the fun begins. At least for me. Painting on a form or in a webpage offers some great programming challenges. It takes a bit of getting
used to, but the end results are very satisfying. If you haven't already, you should visit the basics of Painting the Form for a discussion on GDI+ and
the graphics object. It's pretty brief.
We're going to start by including the Drawing and Drawing2D namespaces as seen in bold at the very beginning of the form's code (in the Form1.cs file):
                using System.Drawing;

                using System.Drawing.Drawing2D;


                namespace Sudoku_Sharp

                {

                       public partial class Form1 : Form

                       {


                       }

                }
The next thing I want to do is do a little forward thinking. One of the things I want to do is, I want the end user to be able to set some color
prefrences. So I want to keep these preferences in the settings of the application so that each time the application is run, it will load the most current
settings, giving the user a nice experience. The first time the application runs, we want the default colors that we set to load. After that the end
user should be able to make their changes and then have them saved for the next time.
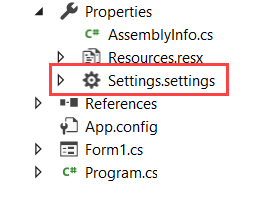
In the Solution Explorer, you want to expand the Properties and double click on Settings.
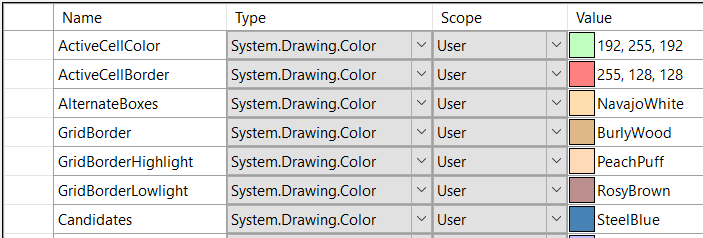
Here are a few of the colors I am setting up in the application's settings. You can set the color by the RGB (Red, Green, Blue) values (0 - 255) or you
can use the named color. Both methods are seen here.
Once we have some default colors set, there is stil some prep work that needs to be done. We need to define a couple of classes that we will use as
objects in the form. In Sudoku the playing board is a grid of 9X9 cells. So, Sudoku has a grid and a grid has cells. This is how we think about
objects in object oriented programming. Let's tackle the grid first.
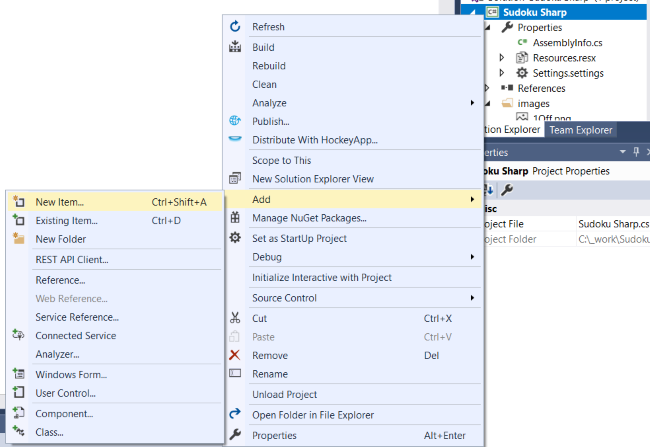
Right click on the project name that is bold in the Solution Explorer and choose Add > New Item (or Ctrl+Shift+A) to open the dialog to add a class. Choose
C# Class from the list and name it grid.cs.
Visual Studio opens up a new tab and you will see the following code.
            using System;

            using System.Collections.Generic;

            using System.Linq;

            using System.Text;

            using System.Threading.Tasks;


            namespace SudokuSharp

            {

                   class grid

                   {

                   }

            }
Do the same thing for the cell class. Instead of naming the class grid, you would name it cell. After that you can start adding properties to the
grid and cell classes. Properties that each would normally own and are specific to that object. For instance, the grid object has cells. All of the
cells should be the same size. So, rather than having to specify each individual cell width and height, I set the properties of cellWidth and cellHeight
in the grid class.
You will notice there is a private variable (scope is within the class only) and a public variable (scope can be used through out the program). It is
fairly standard that you would label the private varable with the first word all lowercase before starting the camel case and the public variable starts the camel
case right from the first word.
            namespace SudokuSharp

            {

                   class grid

                   {

                          private int cellWidth;

                          public int CellWidth

                          {

                                 get { return cellWidth; }

                                 set { cellWidth = value; }

                          }


                          private int cellHeight;

                          public int CellHeight

                          {

                                 get { return cellHeight; }

                                 set { cellHeight = value; }

                          }

                   }

            }
Other properties for the grid class include:
- int X_Offset The offsets are used to offset the grid from the edges of the form.
- int Y_Offset
- int BorderWidth
- bool ShowCandidates
- bool Solved datatype
- bool ControlKeyPressed
- int HighlightedCells
- int DifficultyScore
- int ActiveCellCount
There is a method to instanciate the grid:
            public grid (bool Solved, bool ControlKeyPressed, int DifficultyScore)

            {

                   solved = Solved;

                   controlKeyPressed = ControlKeyPressed;

                   difficultyScore = DifficultyScore;

            }
Remember that C# is a case sensitive language. If you named your class Grid then your method for instantiation should be Grid () because it is returning
that datatype. In my case above, the class is named "grid", with a lower case "g".
And there are three methods that return an array of cell indices. When solving, sometimes you will want to compare all of the cells within a row,
column, or box and rather than calculate what set of cells those include, I chose to set them statically in the method. You can do it any way you choose
as the programmer. Use whatever method you like.
Below is an example of the CellInBox method:
            public int[] GetCellsInBox(int BoxNumber)

            {

                   int[] BoxCells = new int[9];

                   switch (BoxNumber)

                   {

                          case 1:

                                 int[] Box1Cells = { 0, 1, 2, 9, 10, 11, 18, 19, 20 };

                                 BoxCells = Box1Cells;

                                 break;

                          case 2:

                                 int[] Box2Cells = { 3, 4, 5, 12, 13, 14, 21, 22, 23 };

                                 BoxCells = Box2Cells;

                                 break;

                          case 3:

                                 int[] Box3Cells = { 6, 7, 8, 15, 16, 17, 24, 25, 26 };

                                 BoxCells = Box3Cells;

                                 break;

                          case 4:

                                 int[] Box4Cells = { 27, 28, 29, 36, 37, 38, 45, 46, 47 };

                                 BoxCells = Box4Cells;

                                 break;

                          case 5:

                                 int[] Box5Cells = { 30, 31, 32, 39, 40, 41, 48, 49, 50 };

                                 BoxCells = Box5Cells;

                                 break;

                          case 6:

                                 int[] Box6Cells = { 33, 34, 35, 42, 43, 44, 51, 52, 53 };

                                 BoxCells = Box6Cells;

                                 break;

                          case 7:

                                 int[] Box7Cells = { 54, 55, 56, 63, 64, 65, 72, 73, 74 };

                                 BoxCells = Box7Cells;

                                 break;

                          case 8:

                                 int[] Box8Cells = { 57, 58, 59, 66, 67, 68, 75, 76, 77 };

                                 BoxCells = Box8Cells;

                                 break;

                          case 9:

                                 int[] Box9Cells = { 60, 61, 62, 69, 70, 71, 78, 79, 80 };

                                 BoxCells = Box9Cells;

                                 break;

                   }

                   return BoxCells;

            }
In this method I am asking for all of the cell indices for a particular box number. It takes a BoxNumber as input and returns the array of indices for
that box. I'll let you use this method to build the other two (
CellsInRow() and
CellsInCol())
You will do the same procedure for building up the cell class.
In order to use the datatype, Color, as it is below you will need the following code at the top of the class:
using System.Drawing;
            namespace Sudoku_Sharp

            {

                   public class Cell

                   {

                          private Color backgroundColor;

                          public Color BackgroundColor

                          {

                                 get { return backgroundColor; }

                                 set { backgroundColor = value; }

                          }

                   }

            }
Other properties include:
- Color GivenColor
- Color ActiveColor
- Color SolvedColor
- Color CandidateColor
- int CellValue
- string Candidates
- string CandidatePattern
- bool IsGiven
- bool IsActive
- bool IsCurrentCell
- int XCoordinate
- int YCoordinate
- string Peer
- int MarkerValue
The cell class has no methods.
Return to the form designer and double click on the form. Visual Studio will open the form's code in the editor. Add the lines that are in bold.
            using System;

            using System.Collections.Generic;

            using System.ComponentModel;

            using System.Data;

            using System.Drawing;

            using System.Drawing.Drawing2D;

            using System.Linq;

            using System.Text;

            using System.Threading.Tasks;

            using System.Windows.Forms;


            namespace SudokuSharp

            {

                   public partial class Form1 : Form

                   {

                          public Form1()

                          {

                             grid Grid = new grid(false, false, 0);

                             cell[] Cell = new cell[81];


                             InitializeComponent();


                             // Eliminates flicker when painting the form.

                             this.SetStyle(ControlStyles.OptimizedDoubleBuffer, true);

                             this.SetStyle(ControlStyles.StandardClick, true);

                             this.SetStyle(ControlStyles.StandardDoubleClick, true);


                             for (int i = 0; i <= 80; i++)

                             {

                                    Cell[i] = new cell();

                             }

                          }


                          private void Form1_Load(object sender, EventArgs e)

                          {


                          }

                   }

            }
In this code we have instanciated a Grid of type grid and we have instanciated an array of cells. There is also some code to eliminate the flicker
when the form refreshes. And finally, we set each cell in the Cell array to a type of cell.
With all of that ground work laid out, we are now ready to start painting. This happens in the OnPaint event. First I set a few of the Grid properties.
            protected override void OnPaint(PaintEventArgs e)

            {
                   //Assign values to the Grid properties

                   Grid.CellWidth = 50;

                   Grid.CellHeight = 50;

                   Grid.xOffset = 15;

                   Grid.yOffset = 65;

                   Grid.BorderWidth = 12;

            }
Next we'll create some colors using the default color settings we created earlier where we can. You should type the following code withing the OnPaint
event.
            // Set colors from default settings

            Color BoxBackColor = Properties.Settings.Default.Boxes;

            Color AlternateBoxColor = Properties.Settings.Default.AlternateBoxes;

            Color GridBorderColor = Properties.Settings.Default.GridBorder;

            Color GridLinesColor = Properties.Settings.Default.GridLines;
Then we will create some pens.
            // Create some pens

            Pen penThickBlack = new Pen(Color.Black, 2);

            Pen penThinDarkGray = new Pen(Color.DarkGray, -1);

            Pen penThickDrkBrown = new Pen(Color.RosyBrown, 2);

            Pen penThickLhtBrown = new Pen(Color.PeachPuff, 2);

            Pen penGridBorder = new Pen(GridBorderColor, -1);

            Pen penGridLines = new Pen(GridLinesColor, -1);
And we need some brushes
            //Create some brushes

            SolidBrush brshBackground = new SolidBrush(Color.Black);

            SolidBrush brshBorder = new SolidBrush(GridBorderColor);
When we get into adding numbers to the grid, we will add some more colors, pens, brushes, and fonts. But for now, this will do.
Here's where the secret sauce begins:
            // Creating Graphics allows drawing on the form

            Graphics g = e.Graphics;
This creates the graphics object that enables us to paint on the form.
//Draw a frame around the playing area
int f1, f2, g1, g2;
f1 = Grid.xOffset;
g1 = Grid.yOffset;
f2 = ((Grid.CellWidth + 1) * 9) + (Grid.BorderWidth * 2);
g2 = ((Grid.CellHeight + 1) * 9) + (Grid.BorderWidth * 2);
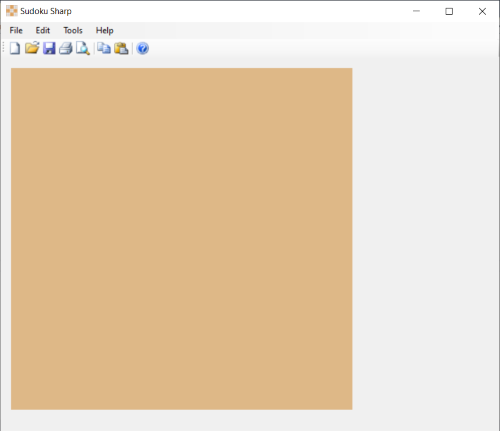
g.FillRectangle(brshBorder, f1, g1, f2, g2);
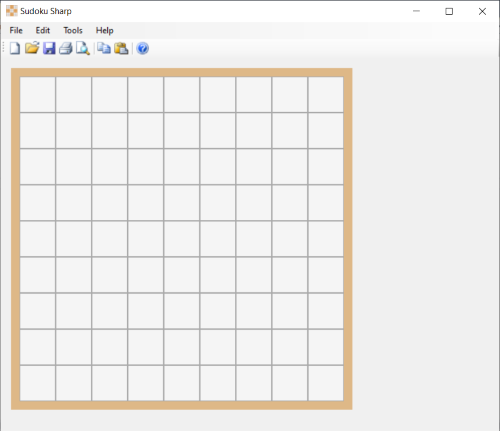
This code creates some variables that will define the beginning point and the size for use in our FillRectangle method. And below is the result of the
labor of our efforts. Pretty cool, ay? Okay, so it's not so exciting...yet!
Another way to fill a rectangle besides using the origin and size points is to use a rectangle that is already defined. I've made a couple of functions
that return a rectangle. One uses a single point and the other uses the starting points (X & Y coordinates) for input. These functions are to return
a rectangle, the size of a cell.
            private Rectangle GetActiveCellRect(Point pntCurrentPoint)

            {

                   Rectangle rectActiveCell = new Rectangle((pntCurrentPoint.Y * (Grid.CellWidth + 1) + Grid.xOffset), (pntCurrentPoint.X * (Grid.CellHeight + 1) + Grid.yOffset), Grid.CellWidth, Grid.CellHeight);

                   return rectActiveCell;

            }


            private Rectangle GetActiveCellRect(int XCoord, int YCoord)

            {

                   Point pntCurrentPoint = new Point();

                   pntCurrentPoint.X = XCoord;

                   pntCurrentPoint.Y = YCoord;

                   Rectangle rectActiveCell = new Rectangle();

                   rectActiveCell = new Rectangle(Grid.xOffset + Grid.BorderWidth + (pntCurrentPoint.Y * (Grid.CellWidth + 1)),

                          Grid.yOffset + Grid.BorderWidth + (pntCurrentPoint.X * (Grid.CellHeight + 1)),

                          Grid.CellWidth,

                          Grid.CellHeight);

                   return rectActiveCell;

            }
To use the functions we are first going to define a rectangle.
Rectangle rectOddGrid = new Rectangle();
Then use it inside of a loop to fill the rectangle. The following code places 81 white rectangles on the form and draws gray gridlines to start forming the board.
            //Draw the playing area grid

		    Point pntNewPoint = new Point();

            int row, col;

            int cellIndex;

            for (row = 0; row < 9; row++)

            {

                   for (col = 0; col < 9; col++)

                   {

                          pntNewPoint.X = row;

                          pntNewPoint.Y = col;

                          rectOddGrid = GetActiveCellRect(row, col);

                          g.FillRectangle(brshBackground, rectOddGrid);

                                 g.DrawRectangle(penGridLines,

                                        (Grid.xOffset + Grid.BorderWidth + (col * (Grid.CellWidth + 1))),

                                        (Grid.yOffset + Grid.BorderWidth + (row * (Grid.CellHeight + 1))),

                                        Grid.CellWidth,

                                        Grid.CellHeight);

                   }

            }
Looks like something's emerging.
Let's snazz it up by putting a black border around the boxes.
            //Outline the playing board and boxes with black lines

            //Horizontal Lines

            Int32 x1, y1, x2, y2;

            Int16 r, c;

            x1 = Grid.xOffset + Grid.BorderWidth;

            x2 = Grid.xOffset + Grid.BorderWidth + (9 * (Grid.CellWidth + 1));

            for (r = 0; r < 10; r += 3)

            {

                   y1 = Grid.yOffset + Grid.BorderWidth + (r * (Grid.CellHeight + 1));

                   y2 = y1;

                   g.DrawLine(penThickBlack, x1, y1, x2, y2);

            }


            //Vertical Lines

            y1 = Grid.yOffset + Grid.BorderWidth;

            y2 = Grid.yOffset + Grid.BorderWidth + (9 * (Grid.CellHeight + 1));

            for (c = 0; c < 10; c += 3)

            {

                   x1 = Grid.xOffset + Grid.BorderWidth + (c * (Grid.CellWidth + 1));

                   x2 = x1;

                   g.DrawLine(penThickBlack, x1, y1, x2, y2);

            }

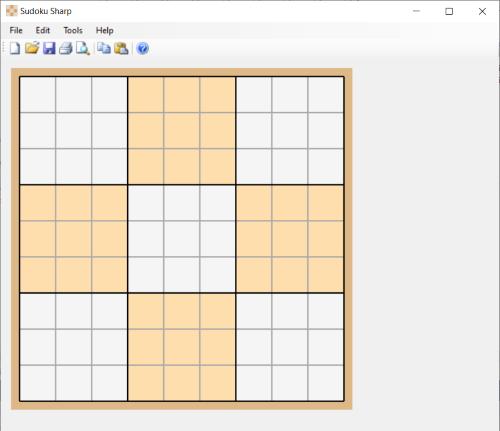
Now we need to color the alternate boxes and then we'll really have something. Add the code in bold below to the looping.
            for (row = 0; row < 9; row++)

            {

                   for (col = 0; col < 9; col++)

                   {

                          pntNewPoint.X = row;

                          pntNewPoint.Y = col;

                          rectOddGrid = GetActiveCellRect(row, col);

                          cellIndex = GetACell(row + 1, col + 1);

                          brshBackground.Color = BoxBackColor;

                          if ((row >= 3 && row <= 5) || (col >= 3 && col <= 5))

                          {

                                 brshBackground.Color = AlternateBoxColor;

                                 if (row >= 3 && row <= 5 && col >= 3 && col <= 5)

                                 {

                                        brshBackground.Color = BoxBackColor;

                                 }

                          }

                          g.FillRectangle(brshBackground, rectOddGrid);

                          g.DrawRectangle(penGridLines,

                                 (Grid.xOffset + Grid.BorderWidth + (col * (Grid.CellWidth + 1))),

                                 (Grid.yOffset + Grid.BorderWidth + (row * (Grid.CellHeight + 1))),

                                 Grid.CellWidth,

                                 Grid.CellHeight);

                   }

            }
And we have something that looks a lot like a Sudoku board.
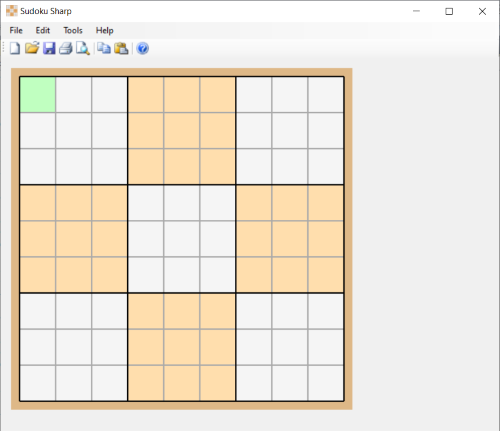
One last thing I want to work on before we move on to a new topic. When making any changes to the Sudoku puzzle, the user will be focused on a single cell.
And so, the concept of the "active" cell. We will get to making changes in mulltiple cells, but lets start small.
First add a couple of colors. ActiveCellColor and CurrentCellBorder shown in bold below. Both are set in the Settings of the application and will become customizable for the
user.
Add the bold code in where you set the colors at the beginning of the OnPaint event.
            // Set colors from default settings

            Color BoxBackColor = Properties.Settings.Default.Boxes;

            Color AlternateBoxColor = Properties.Settings.Default.AlternateBoxes;

            Color GridBorderColor = Properties.Settings.Default.GridBorder;

            Color GridLinesColor = Properties.Settings.Default.GridLines;

            Color ActiveCellColor = Properties.Settings.Default.ActiveCellColor;

            Color CurrentCellBorder = Properties.Settings.Default.CurrentCellBorder;
Add this bold code to the nested for loop for drawing the grid.
            if (Cell[cellIndex].IsActive) { brshBackground.Color = ActiveCellColor; }

            g.FillRectangle(brshBackground, rectOddGrid);

            if (cell[cellIndex].IsCurrentCell)

            {

                   g.DrawRectangle(penCurrCell,

                          (grid.xOffset + grid.BorderWidth + 1 + (col * (grid.CellWidth + 1))),

                          (grid.yOffset + grid.BorderWidth + 1 + (row * (grid.CellHeight + 1))),

                          grid.CellWidth - 2,

                          grid.CellHeight - 2);

            }
One last change. When we first got into the code, there was a Form_Load event created. Add the following code to the Form_Load event.
            private void Form1_Load(object sender, EventArgs e)

            {

                Cell[0].IsActive = true;

                this.Invalidate();

            }
This sets the first cell to active and the
this.Invalidate(); tells Windows that the form needs to be redrawn.
There are several other things we will be adding to the OnPaint event, so hang tight and we will get to those. But for now, I'm going to turn my
attention to the navigation portion of the application; keyboard and mouse clicks. Follow along under the
Navigating the Board.