  a C# learning space
|
Buy me a cup of coffee?
|
Strategic Highlights
Highlighting Candidates
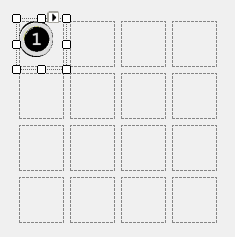
It helps to see just where all of the possible places a particular number could be. This is what highlighting candidates does. I'm going to place a
series of images that will act as buttons to highlight particular numbers. Below is an example of what I will be using. You could use a regular button
if you wish or come up with your own set of images.


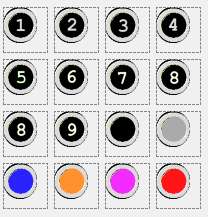
From the toolbox, I use picture boxes. With picture boxes, I can programmatically change the image on the click event. I added 16 buttons for the numbers
1 through 9, pairs, one to clear the numbers/pairs, one to clear markers, and 4 different colored markers.
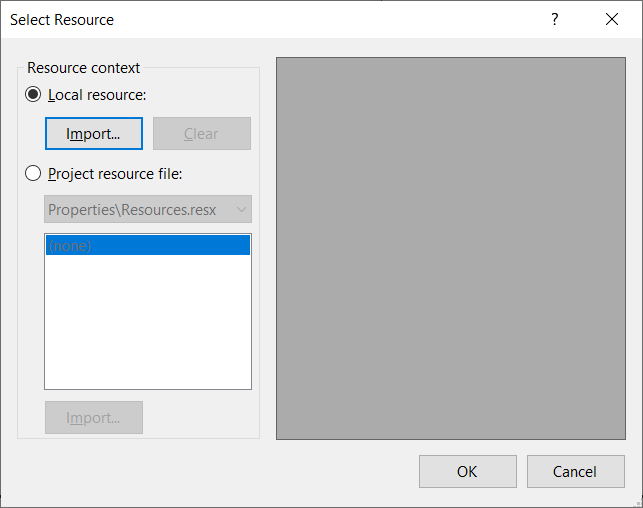
Now each one gets a default image. Set the focus on the picture box by clicking on it. Scroll down in the Properties window to find Image and click the
elipsis. This opens a dialog box to Select the Resource you want as the image. I have the images I need saved with the project so I am using the Local
Resource. Click the Import button and locate the image you want to use, select the image, and click OK.
Rinse and repeat for the remaining picture boxes.
The only highlight buttons that I have turning "on" and "off" are the numbered buttons and the pairs button. There are several ways that this can be
handled, but you as the programmer need to decide what works best for you. I wrote this bit of code three times, all with the same effect. I just liked
this code the best.
Doubleclick on the first button, in this case pb1, to open the shell for the click event. I am making a call to
UppdateButtons();, which
turns off the current button, if one is on. Then back to the click event, it sets the highlighted cells to 1 to highlight all of the cells that contain
the candidate 1. And then it changes the pb1 image from Off (1Off.png) to On (1On.png). Repeat the process for the remaining buttons that will have
this functionality.
            private void pb1_Click(object sender, EventArgs e)

            {

                   UpdateButtons();

                   Grid.HighlightedCells = 1;

                   pb1.Image = Image.FromFile("1On.png");

                   this.Refresh();

            }
            private void UpdateButtons()

            {

                   switch (Grid.HighlightedCells)

                   {

                          case 1:

                                 pb1.Image = Image.FromFile("1Off.png");

                                 break;

                          case 2:

                                 pb2.Image = Image.FromFile("2Off.png");

                                 break;

                          case 3:

                                 pb3.Image = Image.FromFile("3Off.png");

                                 break;

                          case 4:

                                 pb4.Image = Image.FromFile("4Off.png");

                                 break;

                          case 5:

                                 pb5.Image = Image.FromFile("5Off.png");

                                 break;

                          case 6:

                                 pb6.Image = Image.FromFile("6Off.png");

                                 break;

                          case 7:

                                 pb7.Image = Image.FromFile("7Off.png");

                                 break;

                          case 8:

                                 pb8.Image = Image.FromFile("8Off.png");

                                 break;

                          case 9:

                                 pb9.Image = Image.FromFile("9Off.png");

                                 break;

                          case 10:

                                 pbPairs.Image = Image.FromFile("PairsOff.png");

                                 break;

                   }

            }
That takes care of the buttons. Let's turn our attention to the OnPaint event once again. Here we are going to change the background color of a cell
based on which type of candidate we want to focus on. The bold code is where this takes place. It first checks to make sure that
Cell[].Candidates
exists and then based on the
Grid.HighlightedCells will change the background color
            //Draw the playing area grid

            Point pntNewPoint = new Point();

            int row, col;

            int cellIndex;

            for (row = 0; row < 9; row++)

            {

                   for (col = 0; col < 9; col++)

                   {

                          pntNewPoint.X = row;

                          pntNewPoint.Y = col;

                          rectOddGrid = GetActiveCellRect(row, col);

                          cellIndex = GetACell(row + 1, col + 1);

                          brshBackground.Color = BoxBackColor;

                          if ((row >= 3 && row <= 5) || (col >= 3 && col <= 5))

                          {

                                 brshBackground.Color = AlternateBoxColor;

                                 if (row >= 3 && row <= 5 && col >= 3 && col <= 5)

                                 {

                                        brshBackground.Color = BoxBackColor;

                                 }

                          }


                          if (Cell[cellIndex].Candidates != null)

                          {

                                 if (Grid.HighlightedCells == 10 && Cell[cellIndex].Candidates.Length == 2) { brshBackground.Color = CandidateHighlight; }

                                 if (Cell[cellIndex].Candidates.Contains(Grid.HighlightedCells.ToString())) { brshBackground.Color = CandidateHighlight; }

                          }


                          if (Cell[cellIndex].IsActive) { brshBackground.Color = ActiveCellColor; }

                          g.FillRectangle(brshBackground, rectOddGrid);

                          g.DrawRectangle(penGridLines,

                                (Grid.xOffset + Grid.BorderWidth + (col * (Grid.CellWidth + 1))),

                                (Grid.yOffset + Grid.BorderWidth + (row * (Grid.CellHeight + 1))),

                                Grid.CellWidth,

                                Grid.CellHeight);

                          if (Cell[cellIndex].IsCurrentCell)

                          {

                                 g.DrawRectangle(penCurrCell,

                                        (Grid.xOffset + Grid.BorderWidth + 1 + (col * (Grid.CellWidth + 1))),

                                        (Grid.yOffset + Grid.BorderWidth + 1 + (row * (Grid.CellHeight + 1))),

                                        Grid.CellWidth - 2,

                                        Grid.CellHeight - 2);

                          }

                   }

            }
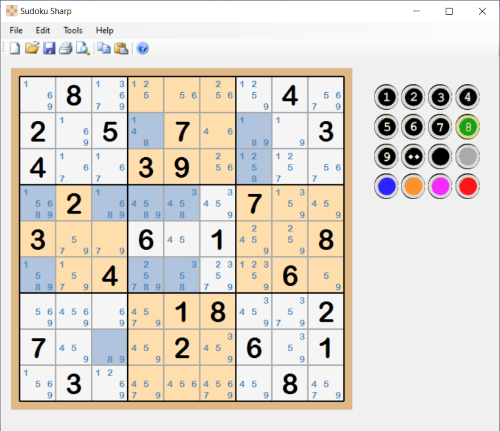
Below is the result. The cells with the candidate 8 are highlighted. And in this case it shows that there is are "hidden singles" in box 2 and 7,
and row 4. So, that cell has to be an 8.
Process of Elimination
Tougher puzzles will require that you look at the candidates and disqualify some of them to reveal the solution. In order to disqualify candidates, let's
get into the right click of the mouse and build a context menu. I want the context menu to reflect which candidates are specific to the cell that was
clicked on. In order to do that we need to build the context menu on the fly. Create the method for building the context menu as seen below. Place it
just after the
Form1_MouseDown event as seen in the code after the
BuildContextMenuSingleCell() code.
This code instanciates a ContextMenuStrip object that we call cms. We also figure out which cell was clicked on by using the
pntMousePos that
is passed to the
BuildContextMenuSingleCell method. Then we set the focos on that cell. And then we start adding items starting with Undo,
which we still need to address, but let's add it for now. Then there are a couple of sections for setting a cell's value or disqualifying a candidate.
For each item we add, we also add an event handler for the
cmsItem_Click event.
Later we'll add the colored markers to the context menu. What's happening here is the context menu is built and rebuilt every time you right click
on the puzzle.
You may be asking yourself if we are building a context menu for a "single" cell, are we going to be building a context menu for "multiple" cells. The
answer is yes, we are. We want to be able disqualify candidates from multiple cells when we hold down the Ctrl key on the keyboard.
            private void BuildContextMenuSingleCell(Point pntMousePos)

            {

                   ContextMenuStrip cms = new ContextMenuStrip();

                   cms.Items.Clear();

                   int curCellRow = GetActiveCellPoint(pntMousePos.X, pntMousePos.Y).X;

                   int curCellCol = GetActiveCellPoint(pntMousePos.X, pntMousePos.Y).Y;

                   int cellIndex = GetACell(curCellRow, curCellCol);

                   Cell[cellIndex].IsActive = true;

                   Cell[cellIndex].IsCurrentCell = true;

                   ToolStripMenuItem cmsUndo = new ToolStripMenuItem("Undo");

                   //cmsUndo.Click += new EventHandler(cmsUndo_Click);

                   cmsUndo.ShortcutKeys = Keys.Control | Keys.Z;

                   cmsUndo.ShowShortcutKeys = true;

                   cms.Items.Add(cmsUndo);

                   cms.Items.Add("-");


                   // Build Set & Disqualify sections

                   for (int i = 0; i <= 80; i++)

                   {

                          if (i != cellIndex)

                          {

                                 Cell[i].IsActive = false;

                                 Cell[i].IsCurrentCell = false;

                          }

                   }

                   for (int c = 1; c <= 9; c++)

                   {

                          if (Cell[cellIndex].Candidates.IndexOf(c.ToString()) > -1)

                          {

                                 ToolStripMenuItem cmsItem = new ToolStripMenuItem("Set as " + c.ToString());

                                 cmsItem.Click += new EventHandler(cmsItem_Click);

                                 cms.Items.Add(cmsItem);

                          }

                   }

                   cms.Items.Add("-");

                   for (int c = 1; c <= 9; c++)

                   {

                          if (Cell[cellIndex].Candidates.IndexOf(c.ToString()) > -1)

                          {

                                 ToolStripMenuItem cmsItem = new ToolStripMenuItem("Disqualify " + c.ToString());

                                 cmsItem.Click += new EventHandler(cmsItem_Click);

                                 cms.Items.Add(cmsItem);

                          }

                   }

                   cms.Items.Add("-");


                   this.ContextMenuStrip = cms;

                   this.Refresh();

            }
NOTE: The creation of the
cmsUndo_Click event handler line of code is commented here because we haven't made the method yet for handling
the Undo click. For now leave it commented and when we add the new method, you can uncomment it.
            if (e.Button == MouseButtons.Right)

            {

                   if (GetActiveCellPoint(pntMousePos.X, pntMousePos.Y).X >= 1 &&

                          GetActiveCellPoint(pntMousePos.X, pntMousePos.Y).X <= 9 &&

                          GetActiveCellPoint(pntMousePos.X, pntMousePos.Y).Y >= 1 &&

                          GetActiveCellPoint(pntMousePos.X, pntMousePos.Y).Y <= 9)

                   {

                          int curCellRow = GetActiveCellPoint(pntMousePos.X, pntMousePos.Y).X;

                          int curCellCol = GetActiveCellPoint(pntMousePos.X, pntMousePos.Y).Y;

                          int cellIndex = GetACell(curCellRow, curCellCol);

                          if (!cell[cellIndex].IsActive)

                          {

                                 for (int i = 0; i <= 80; i++)

                                 {

                                        if (i != cellIndex)

                                        {

                                               cell[i].IsActive = false;

                                        }

                                 }

                          }

                          BuildContextMenuSingleCell(pntMousePos);

                   }

            }
Next we need something to happen when we click on the context menu. To do that we need to build the event handler where the action takes place when we
click an item in the context menu. Remember we added the
cmsItem_Click event for each item programmatically, so the shell for the event handler
doesn't get created automatically like we've done before. Enter the code below so that our context menu has some action when we click on one of the items.
            private void cmsItem_Click(object sender, EventArgs e)

            {

                   int x;

                   string action = "";

                   x = int.Parse(sender.ToString().Substring(sender.ToString().Length - 1, 1));

                   action = sender.ToString().Substring(0, sender.ToString().Length - 2);


                   for (int i = 0; i <= 80; i++)

                   {

                          if (Cell[i].IsActive)

                          {

                                 if (action == "Set as")

                                 {

                                        Cell[i].CellValue = x;

                                 }


                                 if (action == "Disqualify")

                                 {

                                        Cell[i].Candidates = Cell[i].Candidates.Replace(x.ToString(), "");

                                 }


                                 SetCellCandidates();

                                 this.Refresh();

                          }

                   }

            }
Test out the code we just added by pasting a puzzle into the application and then right click on a cell and choose disqualify for one of the candidates
and then right click on the same cell to make sure the candidate is gone. Then right click and test the set candidate and the cell should change to
solved and the candidate shows in the cell.
Double Click
Let's say there is only one candidate left in an unsolved cell. It's called a Naked Single. It's pretty obvious what the solution is for that cell. To
make things a little easier, we're going to make it possible to double click on Naked Singles and have it switch to a solved cell. To do this we need to
go back to the design screen and add an event for double click on the form.
            private void Form1_DoubleClick(object sender, EventArgs e)

            {

                   Point pntMousePos = this.PointToClient(Cursor.Position);

                   if (GetActiveCellPoint(pntMousePos.X, pntMousePos.Y).X >= 1 &&

                          GetActiveCellPoint(pntMousePos.X, pntMousePos.Y).X <= 9 &&

                          GetActiveCellPoint(pntMousePos.X, pntMousePos.Y).Y >= 1 &&

                          GetActiveCellPoint(pntMousePos.X, pntMousePos.Y).Y <= 9)

                   {

                          Grid.ControlKeyPressed = false;

                          for (int i = 0; i <= 80; i++)

                          {

                                 Cell[i].IsActive = false;

                          }

                          int curCellRow = GetActiveCellPoint(pntMousePos.X, pntMousePos.Y).X;

                          int curCellCol = GetActiveCellPoint(pntMousePos.X, pntMousePos.Y).Y;

                          int cellIndex = GetACell(curCellRow, curCellCol);

                          if (Cell[cellIndex].Candidates.Length == 1)

                          {

                                 Cell[cellIndex].CellValue = int.Parse(Cell[cellIndex].Candidates);

                                 Cell[cellIndex].IsActive = true;

                                 Cell[cellIndex].IsCurrentCell = true;

                                 SetCellCandidates();

                          }

                          this.Refresh();

                   }

            }
Once again, test the code to make sure it works. Eliminate all but one candidate in a cell and then double click on the cell. The last candidate should
become the solution for that cell.
Markers
Markers are used to highlight cells within a chain. This is a more advanced method of solving that will get covered in the strategies section.
Add some event handlers for the Markers from the design screen, one for each colored button.
            private void pbMarker1_Click(object sender, EventArgs e)

            {


            }


            private void pbMarker2_Click(object sender, EventArgs e)

            {


            }


            private void pbMarker3_Click(object sender, EventArgs e)

            {


            }


            private void pbMarker4_Click(object sender, EventArgs e)

            {


            }
Add the code to each of the event handlers. Make sure to change the MarkerValue to the same marker number. The code will set the background color for
each active cell to the marker color specified.
            for (int x = 0; x < 80; x++)

            {

                   if (Cell[x].IsActive)

                   {

                          Cell[x].MarkerValue = 1;  // Change the MarkerValue to reflect the correct marker

                   }

            }

            this.Refresh();
Let's also add a way to clear the marker colors from the grid. Another way to add the event handler code is to double click on the button. This will
create all of the code needed to kick off the event. You just need to add the code for the action. Try it out. Double click on the Clear Marker button
and then past the code below.
            private void pbClearMarker_Click(object sender, EventArgs e)

            {

                      for (int x = 0; x < 80; x++)

                      {

                             Cell[x].MarkerValue = 0;

                      }

                      this.Refresh();

            }
And now back to the
OnPaint event. Add the colors for the markers in the section where we added other colors.
            Color Marker1Color = Properties.Settings.Default.Marker1;

            Color Marker2Color = Properties.Settings.Default.Marker2;

            Color Marker3Color = Properties.Settings.Default.Marker3;

            Color Marker4Color = Properties.Settings.Default.Marker4;
And further down in the
OnPaint event. Add the code in bold after setting the Active cell color.
            if (Cell[cellIndex].IsActive) { brshBackground.Color = ActiveCellColor; }


            switch (Cell[cellIndex].MarkerValue)

            {

                   case 1:

                          brshBackground.Color = Marker1Color;

                          break;

                   case 2:

                          brshBackground.Color = Marker2Color;

                          break;

                   case 3:

                          brshBackground.Color = Marker3Color;

                          break;

                   case 4:

                          brshBackground.Color = Marker4Color;

                          break;

            }
And test. You should be able to change the background of individual cells to the respective marker color.

Selecting Mutiple Cells
Changing the colors one cell at a time can be a hassle. You may also want to remove multiple instances of a candidate at one time. The way you select
multiple items in Windows is to hold down the Ctrl key while you make your selection. That is the behavior we want to emulate here. To do that we need to
add code to the
Form1_KeyDown event. The following code looks for the Ctrl key to be pressed and if it finds that happening, it sets a flag
that the key is being held down.
            private void Form1_KeyDown(object sender, KeyEventArgs e)

            {

                   if (e.KeyCode == Keys.ControlKey) { Grid.ControlKeyPressed = true; }

            }
In the
Form1_MouseDown event, we need to add some code to have a different behavior when the Ctrl key is being held down and the user
clicks the
left mouse button. We want this action to select multiple cells.
            if (e.Button == MouseButtons.Left)

            {

                   int curCellRow = GetActiveCellPoint(pntMousePos.X, pntMousePos.Y).X;

                   int curCellCol = GetActiveCellPoint(pntMousePos.X, pntMousePos.Y).Y;

                   int cellIndex = GetACell(curCellRow, curCellCol);

                   if (Grid.ControlKeyPressed)

                   {

                          for (int i = 0; i <= 80; i++)

                          {

                                 Cell[i].IsCurrentCell = false;

                          }

                          Cell[cellIndex].IsActive = true;

                          Cell[cellIndex].IsCurrentCell = true;

                          Grid.ActiveCellCount += 1;

                   }

                   else

                   {

                          for (int i = 0; i <= 80; i++)

                          {

                                 Cell[i].IsActive = false;

                                 Cell[i].IsCurrentCell = false;

                          }

                          Cell[cellIndex].IsActive = true;

                          Cell[cellIndex].IsCurrentCell = true;

                          Grid.ActiveCellCount = 1;

                   }

            }
The other place where we need to be able to affect multiple cells is in the context menu. Users should be able to select multiple cells and then disqualify
a candidate in all of those cells. For instance, if you have a Naked Pair, that is two cells with two candidates that are the same in a row, column, or box
then all other candidates that are the same as the naked pair would be disqualified from that row, column, or box. If we examine the puzze below we see
a Naked Pair in Box 3, the 1 and 9. This means we can disqualify the 1 and the two 9s from Box 3. Holding down the Ctrl key we can select the cells that
contain the 1 and 9s, not the Naked Pair, then right click and disqualify 9s and right cick again and disquaify the 1.

To accomplish this we are going to build a slightly different context menu. One where the verbage matches more with the task we are going to do. We
aren't going to do any setting of solved cells on this one. But we are going to include the disqualify functionality and instead of it say "Disqualify 1"
it will say "Disqualify 1s", since we will be handling multiple cells.
            private void BuildContextMenuMultipleCell(Point pntMousePos)

            {

                   ContextMenuStrip cms = new ContextMenuStrip();

                   cms.Items.Clear();

                   int curCellRow = GetActiveCellPoint(pntMousePos.X, pntMousePos.Y).X;

                   int curCellCol = GetActiveCellPoint(pntMousePos.X, pntMousePos.Y).Y;

                   int cellIndex = GetACell(curCellRow, curCellCol);

                   Cell[cellIndex].IsActive = true;

                   Cell[cellIndex].IsCurrentCell = true;

                   ToolStripMenuItem cmsUndo = new ToolStripMenuItem("Undo");

                   //cmsUndo.Click += new EventHandler(cmsUndo_Click);

                   cmsUndo.ShortcutKeys = Keys.Control | Keys.Z;

                   cmsUndo.ShowShortcutKeys = true;

                   cms.Items.Add(cmsUndo);

                   cms.Items.Add("-");


                   // Build Disqualify section

                   string AllCandidates = "";

                   for (int i = 0; i <= 80; i++)

                   {

                          if (i != cellIndex)

                          {

                                 Cell[i].IsCurrentCell = false;

                          }

                          if (Cell[i].IsActive)

                          {

                                 AllCandidates += Cell[i].Candidates;

                          }

                   }

                   for (int c = 1; c <= 9; c++)

                   {

                          if (AllCandidates.IndexOf(c.ToString()) > -1)

                          {

                                 ToolStripMenuItem cmsItem = new ToolStripMenuItem("Disqualify " + c.ToString() + "s");

                                 cmsItem.Click += new EventHandler(cmsItem_Click);

                                 cms.Items.Add(cmsItem);

                          }

                   }


                   this.ContextMenuStrip = cms;

                   this.Refresh();

            }
NOTE: The creation of the
cmsUndo_Click event handler line of code is commented here because we haven't made the method yet for handling
the Undo click. For now leave it commented and when we add the new method, you can uncomment it.
And in the
Form1_MouseDown event we need to update the code.
            if (Grid.ActiveCellCount > 1)

            {

                   BuildContextMenuMultipleCell(pntMousePos);

            }

            else

            {

                   BuildContextMenuSingleCell(pntMousePos);

            }
Also, when a user right clicks away from the active cells, the context menu needs to change from it's plural form to singular because the user changed
the focus to a new single cell. We should add the code to the
right click in the
Form1_MouseDown event.
            if (!Cell[cellIndex].IsActive)

            {

                   for (int i = 0; i <= 80; i++)

                   {

                          if (i != cellIndex)

                          {

                                 Cell[i].IsActive = false;

                                 Grid.ActiveCellCount = 1;

                          }

                   }

            }
Let's add a little more functionality to the context menu. We're going to give the ability to set markers. Add the following code to the two methods
that build the context menu.
            cms.Items.Add("-");


            ToolStripMenuItem cmsMarker1 = new ToolStripMenuItem("Marker1");

            ToolStripMenuItem cmsMarker2 = new ToolStripMenuItem("Marker2");

            ToolStripMenuItem cmsMarker3 = new ToolStripMenuItem("Marker3");

            ToolStripMenuItem cmsMarker4 = new ToolStripMenuItem("Marker4");

            cmsMarker1.Click += new EventHandler(cmsMarker1_Click);

            cmsMarker2.Click += new EventHandler(cmsMarker2_Click);

            cmsMarker3.Click += new EventHandler(cmsMarker3_Click);

            cmsMarker4.Click += new EventHandler(cmsMarker4_Click);

            cms.Items.Add(cmsMarker1);

            cms.Items.Add(cmsMarker2);

            cms.Items.Add(cmsMarker3);

            cms.Items.Add(cmsMarker4);

            this.ContextMenuStrip = cms;

            this.Refresh();
Then for each marker click event (1 through 4) add the code that will set the active cell's marker value to its associated marker number. Marker1_Click
would have a MarkerValue equal to 1, Marker2 has a MarkerValue of 2, etc.
            private void cmsMarker1_Click(object sender, EventArgs e)

            {

                for (int x = 0; x <= 80; x++)

                {

                    if (Cell[x].IsActive)

                    {

                        Cell[x].MarkerValue = 1;  //  Changes the MarkerValue to 1 to match Marker1_Click

                    }

                }

                this.Refresh();

            }
Oops! I Want a Do Over
What happens when a user makes a mistake. They usually want to undo what they did and try it again. We will now address how to Undo a move. It all begins
with a Stack. Think of a deck of cards. You place a card on the table and then place the next card on top of that and repeat. You will end up with a stack
of cards. When you want to take cards away, you start with the card on the top. A Stack in programming works the same way. For each move that is made,
something gets placed in the stack to tell what was done. Then when the user clicks Undo, it removes that last move and restores the board.
A couple of things to keep in mind when programming the Undo/Redo functionality. Undo can be like a light switch, either on or off. When it is, the Undo
is pretty simple. Instead of the light being on, Undo switches it off and vise versa. But in our case, there is more than just an on/off situation. In our
case we need to capture the "state" of the puzzle, in order to restore it when the user clicks Undo. In other words, if a cell is solved, it changes values
in other cells. We need to be able to restore all of the affected cells in the Undo.
Most applications that offer the Undo functionality also offer the Redo functionality. Same concept as Undo, but in reverse. As, a user clicks Undo, the
Redo stack fills up and then when the user clicks Redo, it undoes the Undo. Or one stack depleats as the other fills. The Redo stack goes down and the Undo
stack gets the value from Redo so the user could click Undo again if needed.
Let's start by including the
System.Collections namespace. And then add the two stacks at the beginning of the Form code to make them globally
available.
using System.Collections;
            public partial class Form1 : Form

            {

                   grid Grid = new grid(false, false, 0);

                   cell[] Cell = new cell[81];

                   Stack Undo = new Stack();

                   Stack Redo = new Stack();
Returning to our card analogy. When you place a card on the stack, it's known as a "push" to the stack. In code it would like like this
Undo.Push(<string>). To remove a card, you would "pop" from the stack. You can also "peek" at the card on top without removing it
from the stack, which gives you the object in the stack to use.
I want to push something to the Undo stack that will tell me what action took place and what was the effect. In Sudoku there are two basic actions that
can take place. The first is to place a number in a blank cell. When a number is placed in a cell, I call the cell solved. The other action would be to
disqualify a candidate. So, here's what I want to push to the Undo stack. An action, the main cell involved in the action along with all of its candidates
and then all of the other cells that are affected due to the action. I will use an "s" for solved and an "d" for disqualification. If I solve a cell, I
also have to eliminate the solution (or cell value) from it's peers, because that number can no longer be in any peer cells.
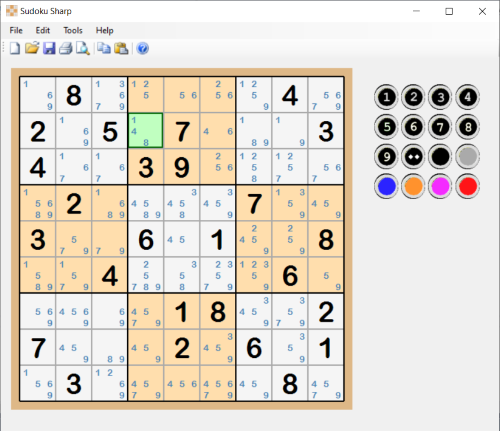
Take a look at our puzzle below. You can see that there is an 8 that is a Hidden Single in box 2 (Cell[12]). No other cells in the box have an 8 as a
candidate. So, we can solve that cell by setting the cell value to 8. By doing so, we need to remove 8s from all of the peer cells in the 2nd row
and 4th column. Cell[15] in row 2 contains an 8 as a candidate. Cell[30] and Cell[48] contain 8s as candidates in column 4. When we place an 8 in Cell[12],
we are also removing the candidates from Cell[15], Cell[30], and Cell[48]. We are also removing the other candidates from Cell[12] (1 and 4). I want to push
a string to the Undo Stack that has the letter s (for solved), cell value 8, the candidates as they stand before the change, Cell[12], Cell[15], Cell[30], and
Cell[48]. I'll make it simpler by making it look like this: s,8,148,12,15,30,48. This tells me that I solved a cell with the cell value 8, the candidates
before the change were 148, 12 is the index of the cell that was solved, and I removed the 8 as a candidate from cells 15, 30, and 48. So, if I have to undo
my move, I know exactly what I did in order to return the board to where it was before the move. The same can be done for disqualification. The string d,8,15
tells me that I disqualified an 8 as a candidate from Cell[15]. Disqualifying an 8 from multiple cells would look like: d,8,15,30,48.
I'll go about this using two different functions that will build the string to push to the Undo Stack. We'll start with the easy one. Both functions
are named the same, but have different "signatures". The difference is in the arguments sent to the function. This is called overloading. The
function that takes an action and a candidate as arguments, is to create the Undo String when a user disqualifies a candidate.
            private string CreateUndoString(string action,string candidate)

            {

                   string UndoString = "";

                   if (action == "d")

                   {

                          UndoString += "d," + candidate;

                          for (int x = 0; x <= 80; x++)

                          {

                                 if (Cell[x].IsActive)                                   // Capture all cells that are active

                                 {

                                        if (Cell[x].Candidates.IndexOf(candidate) > -1)     // Make sure candidate exists in cell

                                        {

                                               UndoString += "," + x.ToString();

                                        }

                                 }

                          }

                   }

                   return UndoString;

            }
Here we are testing to make sure we are using the correct action before we do anything else. The we set the beginning of the Undo String with the letter
"d" and concatinate the candidate we are disqualifying. Next we want to capture all of the active cells whether we are disqualifying a candidate from a
single cell or multiple cells and add those to the Undo string.
Adding the summary at the beginning of the function (type the /// to create the summary) allows you to type your own expanation of the function. Then when
you go to use the new code in the
Form1_KeyDown method for typing numbers into a cell, type the name of the function and the left
parenthesis and the intelesense shows you what you typed into the summary section. So you want to type something meaningful to remember what it is for.
This is useful especially when you have overloaded functions so that you can scroll through the different options for using the function.

The creation of the Undo String when solving a cell is a little more complicated, but it's not that difficult to grasp. The same process is just
repeated once for the row, once for the column, and once for the box. Each loop checks the peers of the cell being solved and if the candidate exists
in the cell, it gets placed into the Undo String. You'll notice that there is a function in the Grid object to get the list of cells in a row, column,
or box. Refer back to when we set up the Grid object for the code.
            private string CreateUndoString(string action,int cellIndex,int cellValue)

            {

                   string UndoString = "";

                   if (action == "s")

                   {

                          UndoString += "s," + cellValue.ToString() + "," + Cell[cellIndex].Candidates + "," + cellIndex.ToString();

                          int[] CellsInRow = new int[9];

                          int[] CellsInCol = new int[9];

                          int[] CellsInBox = new int[9];

                          int RowNum = int.Parse(Cell[cellIndex].Peer.Substring(0, 1));

                          int ColNum = int.Parse(Cell[cellIndex].Peer.Substring(1, 1));

                          int BoxNum = int.Parse(Cell[cellIndex].Peer.Substring(2, 1));

                          CellsInRow = Grid.GetCellsInRow(RowNum);

                          CellsInCol = Grid.GetCellsInCol(ColNum);

                          CellsInBox = Grid.GetCellsInBox(BoxNum);


                          foreach (int index in CellsInRow)

                          {

                                 if (UndoString.IndexOf("," + index.ToString()) == -1)  // Skip if the cell index is already in the Undo String

                                 {

                                        if (Cell[index].Candidates.IndexOf(cellValue.ToString()) != -1)

                                        {

                                               UndoString += "," + index.ToString();

                                        }

                                 }

                          }


                          foreach (int index in CellsInCol)

                          {

                                 if (UndoString.IndexOf("," + index.ToString()) == -1)

                                 {

                                        if(Cell[index].Candidates.IndexOf(cellValue.ToString()) != -1)

                                        {

                                               UndoString += "," + index.ToString();

                                        }

                                 }

                          }


                          foreach (int index in CellsInBox)

                          {

                                 if (UndoString.IndexOf("," + index.ToString()) == -1)

                                 {

                                        if(Cell[index].Candidates.IndexOf(cellValue.ToString()) != -1)

                                        {

                                               UndoString += "," + index.ToString();

                                        }

                                 }

                          }

                   }

                   return UndoString;

            }
Here's the summary:

We need to push to the Undo stack when we solve a cell either when we highlight a cell and press a numbered key or when we right cick and set a number in
a cell using the context menu.
In the
Form1_KeyUp method, add the following bold code when pressing a numbered key on the keyboard.
            if (int.Parse(KeyValue) != 0)

            {

                   if (!Cell[cellIndex].IsGiven)

                   {

                          Cell[cellIndex].CellValue = int.Parse(KeyValue);

                          Undo.Push(CreateUndoString("s", cellIndex, int.Parse(KeyValue)));

                          MessageBox.Show(CreateUndoString("s", cellIndex, int.Parse(KeyValue)));

                          SetCellCandidates();
                   }

            }
The
Undo.Push() is the import bit of code. I've added a messagebox to be able to troubleshoot and make sure the Undo String I am pushing
is what I expect. You will want to remove the messagebox from your code after troubleshooting or it will get annoying.
Now on to the context menu. The bold code below shows the two different actions being pushed to the Undo Stack in the
cmsItem_Click method.
            if (Cell[i].IsActive)

                   {

                          if (action == "Set as")

                          {

                                 Cell[i].CellValue = x;

                                 Undo.Push(CreateUndoString("s", i, x));

                                 if (Redo.Count > 0) { Redo.Clear(); }

                          }


                          if (action == "Disqualify")

                          {

                                 Cell[i].Candidates = Cell[i].Candidates.Replace(x.ToString(), "");

                                 Undo.Push(CreateUndoString("d", x.ToString()));

                          }