  a C# learning space
|
Buy me a cup of coffee?
|
Navigating the Board
So far we have done some painting on the form and we have what looks like a Sudoku puzzle board. But we can't do anything with it just yet. We need a way
to get around. Some people like to use the keyboard with the arrow keys. Some like to use the mouse. Some like to use both. Any way you slice it, they
need a way to navigate the board.
Before we get too deep in the code, let's talk a little about commenting code. Making comments in your code will assist you down the road when you forgot
why you did something or even what a particular bit of code is supposed to do.
Add this code to the end of the Form.cs code. Then place your cursor just above the p in private at the top and type three forward slashes (///).
This shortcut will create a shell for comments for the method. Then just fill in the blanks as you see below. You will also want to add some comments
here and there within you code to remind yourself of what's going on. If you work with others or are maintaining someone else's code, you will
appreciate the comments that you or someone else left behind.
/// <summary>
/// Returns the upper left corner X and Y coordinates creating a point on the grid.
/// </summary>
/// <param name="X"></param>
/// <param name="Y"></param>
/// <returns>Point</returns>
        private Point GetActiveCellPoint(int X, int Y)

        {

               Point pntActivePoint;

               int row, col;

               double rowValue, colValue;

               rowValue = (Y - (Grid.yOffset + Grid.BorderWidth)) / (Grid.CellHeight + 1) + 1;

               colValue = (X - (Grid.xOffset + Grid.BorderWidth)) / (Grid.CellWidth + 1) + 1;

               row = Convert.ToInt16(Math.Floor(rowValue));

               col = Convert.ToInt16(Math.Floor(colValue));

               if (row >= 1 && row <= 9 && col >= 1 && col <= 9)

               {

                      pntActivePoint = new Point(row, col);

               }

               else

               {

                      pntActivePoint = new Point(5, 5);

               }

               return pntActivePoint;

        }
Besides comments, another thing to keep in mind is to try to keep like code together so that you don't have to search high and low for the code you want to
modify. I suggest setting up regions within your code and you can collapse the regions you aren't working on to keep things a little cleaner.
Here are the regions that I set up in my code but I encourage you to come up with your own ideas on how to organize your code:
- FormMethods
- GridNavigationMethods
- CellDefinitionMethods
- InitializePuzzle
- SolvingMethods
- PuzzleCreationMethods
Most of the code we will take a look at on this page will fall under the GridNavigationMethods region. To set up a region, use the following syntax:
        #region InitializePuzzle

           <Code goes here>

        #endregion
Now let's get to the good stuff.
Mouse Clicks
Now that you've put the GetActiveCellPoint method into your code, we'll add a Form1_Click event handler.
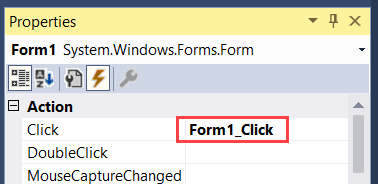
Switch to the Form1.cs [Design] tab and set the focus on the form by left clicking on the form. Next in the Properties window, click on the Events button

and under Actions, there should be a Click event. To the right type Form1_Click and
press enter.
This will create a Form1_Click event handler in the InitializeComponent() so that the application knows what to do when you click on the form. We will make
several of these event handlers for mouse clicks and key presses from the keyboard. When I refer to event handlers later on you will need to follow these
steps.
This also creates a shell method for the Form1_Click event.
            private void Form1_Click(object sender, EventArgs e)

            {


            }
And use the following code in the Form1_Click event
            private void Form1_Click(object sender, EventArgs e)

            {

                   Point pntMousePos = this.PointToClient(Cursor.Position);


                   if (GetActiveCellPoint(pntMousePos.X, pntMousePos.Y).X >= 1 &&

                          GetActiveCellPoint(pntMousePos.X, pntMousePos.Y).X <= 9 &&

                          GetActiveCellPoint(pntMousePos.X, pntMousePos.Y).Y >= 1 &&

                          GetActiveCellPoint(pntMousePos.X, pntMousePos.Y).Y <= 9)

                   {


                          int curCellRow = GetActiveCellPoint(pntMousePos.X, pntMousePos.Y).X;

                          int curCellCol = GetActiveCellPoint(pntMousePos.X, pntMousePos.Y).Y;

                          int cellIndex = GetACell(curCellRow, curCellCol);


                          Cell[cellIndex].IsActive = true;


                          this.Refresh();

                   }

            }
Now lets create another event handler for the Form1_MouseDown event and add the folowing code to the shell method that gets created. The following code
first finds the point on the form where the mouse was clicked. Then it will perform actions on whether or not it was a left click or a right click.
        private void Form1_MouseDown(object sender, MouseEventArgs e)

        {

               Point pntMousePos = this.PointToClient(Cursor.Position);


               // Handles the right mouse click

               if (e.Button == MouseButtons.Right)

               {

                      if (GetActiveCellPoint(pntMousePos.X, pntMousePos.Y).X >= 1 &&

                             GetActiveCellPoint(pntMousePos.X, pntMousePos.Y).X <= 9 &&

                             GetActiveCellPoint(pntMousePos.X, pntMousePos.Y).Y >= 1 &&

                             GetActiveCellPoint(pntMousePos.X, pntMousePos.Y).Y <= 9)

                      {

                             int curCellRow = GetActiveCellPoint(pntMousePos.X, pntMousePos.Y).X;

                             int curCellCol = GetActiveCellPoint(pntMousePos.X, pntMousePos.Y).Y;

                             int cellIndex = GetACell(curCellRow, curCellCol);

                             if (!Cell[cellIndex].IsActive)

                             {

                                    for (int i = 0; i <= 80; i++)

                                    {

                                           if (i != cellIndex)

                                           {

                                                  Cell[i].IsActive = false;

                                                  Cell[i].IsCurrentCell = false;

                                           }

                                    }

                             }

                             Cell[cellIndex].IsCurrentCell = true;

                      }

               }


               // Handles the left mouse click

               if (e.Button == MouseButtons.Left)

               {

                      if (GetActiveCellPoint(pntMousePos.X, pntMousePos.Y).X >= 1 &&

                             GetActiveCellPoint(pntMousePos.X, pntMousePos.Y).X <= 9 &&

                             GetActiveCellPoint(pntMousePos.X, pntMousePos.Y).Y >= 1 &&

                             GetActiveCellPoint(pntMousePos.X, pntMousePos.Y).Y <= 9)

                      {

                             int curCellRow = GetActiveCellPoint(pntMousePos.X, pntMousePos.Y).X;

                             int curCellCol = GetActiveCellPoint(pntMousePos.X, pntMousePos.Y).Y;

                             int cellIndex = GetACell(curCellRow, curCellCol);

                             if (Grid.ControlKeyPressed)

                             {

                                    for (int i = 0; i <= 80; i++)

                                    {

                                           Cell[i].IsCurrentCell = false;

                                    }

                                    Cell[cellIndex].IsActive = true;

                                    Cell[cellIndex].IsCurrentCell = true;

                                    Grid.ActiveCellCount += 1;

                             }

                             else

                             {

                                    for (int i = 0; i <= 80; i++)

                                    {

                                           Cell[i].IsActive = false;

                                           Cell[i].IsCurrentCell = false;

                                    }

                                    Cell[cellIndex].IsActive = true;

                                    Cell[cellIndex].IsCurrentCell = true;

                                    Grid.ActiveCellCount = 1;

                             }

                      }

               }

        }
Run the code and click somewhere on the grid. The new cell you click on will become the active cell.
Keyboard Navigation
In the code for keyboard navigation, I use the concept of Peers to test the borders for the arrow keys for movement. Let's discuss Peers for just a momment and then
we will add the code to create Peers and set them. A single cell on the Sudoku board belongs to a row, a column, and a box. Cell[0] is in row 1, column
1, and box 1. So, it has Peers in row 1, column 1, and box 1. I set the Peers for Cell[0] to 111 as a string. While Cell[0] is the active cell and the
user presses the left arrow key, that would move the active cell beyond the first column. We don't want that. Therefore, when pressing the left arrow key
I check to see if the first character in the Peer string is greater than one. If so, then it is legal to move one column to the left. Same principal
applies to the 9th column and the 1st & 9th rows when using the right, up, and down arrows respectively.
Add the
AssignCellPeers(); call in the Form1_Load method.
            private void Form1_Load(object sender, EventArgs e)

            {

                   Cell[0].IsActive = true;

                   AssignCellPeers();

                   this.Invalidate();

            }
The add the following code to assign cell peers to the array of cell objects.
            private void AssignCellPeers()

            {

                   int index = 0;

                   int box = 1;

                   for (int row = 1; row <= 9; row++)

                   {

                          switch (row)

                          {

                                 case 2:

                                 case 3:

                                        box = 1;

                                        break;

                                 case 4:

                                 case 5:

                                 case 6:

                                        box = 4;

                                        break;

                                 case 7:

                                 case 8:

                                 case 9:

                                        box = 7;

                                        break;

                          }


                          for (int col = 1; col <= 9; col++)

                          {

                                 Cell[index].Peer = row.ToString() + col.ToString() + box.ToString();

                                 if (col == 3 || col == 6 || col == 9)

                                 {

                                        box += 1;

                                 }

                                 index += 1;

                          }

                   }

            }
Create an event handler in the Properties > Events > Key > KeyUp window.
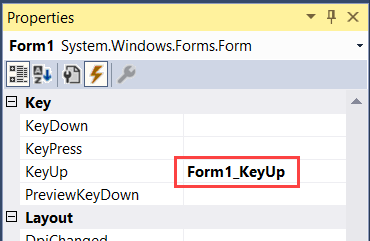
Add the following code to the Form1_KeyUp method.
        private void Form1_KeyUp(object sender, KeyEventArgs e)

        {

               int cellIndex = 0;

               bool movedCursor = false;


               // Test for arrow key being pressed and then capture the active cell index.

               if (e.KeyCode.ToString() == "Left" || e.KeyCode.ToString() == "Right" || e.KeyCode.ToString() == "Up" || e.KeyCode.ToString() == "Down")

               {

                      for (int i = 0; i <= 80; i++)

                      {

                          if (Cell[i].IsActive)

                          {

                                 cellIndex = i;

                    }

                         }

               }


               // Action for left arrow key press

               if (e.KeyCode.ToString() == "Left")

               {

                      // Test for active cell being the first column.

                      if (int.Parse(Cell[cellIndex].Peer.Substring(1, 1)) > 1)

                      {

                             // Deactivate the current cell and activate the cell to the left of it

                             Cell[cellIndex].IsActive = false;

                             Cell[cellIndex].IsCurrentCell = false;

                             Cell[cellIndex - 1].IsActive = true;

                             Cell[cellIndex - 1].IsCurrentCell = true;

                             // If the cursor moved then refresh the form

                             movedCursor = true;

                      }

               }


               if (e.KeyCode.ToString() == "Right")

               {

                      if (int.Parse(Cell[cellIndex].Peer.Substring(1, 1)) < 9)

                      {

                             Cell[cellIndex].IsActive = false;

                             Cell[cellIndex].IsCurrentCell = false;

                             Cell[cellIndex + 1].IsActive = true;

                             Cell[cellIndex + 1].IsCurrentCell = true;

                             movedCursor = true;

                      }

               }


               if (e.KeyCode.ToString() == "Up")

               {

                      if (int.Parse(Cell[cellIndex].Peer.Substring(0, 1)) > 1)

                      {

                             Cell[cellIndex].IsActive = false;

                             Cell[cellIndex].IsCurrentCell = false;

                             Cell[cellIndex - 9].IsActive = true;

                             Cell[cellIndex - 9].IsCurrentCell = true;

                             movedCursor = true;

                      }

               }


               if (e.KeyCode.ToString() == "Down")

               {

                      if (int.Parse(Cell[cellIndex].Peer.Substring(0, 1)) < 9)

                      {

                             Cell[cellIndex].IsActive = false;

                             Cell[cellIndex].IsCurrentCell = false;

                             Cell[cellIndex + 9].IsActive = true;

                             Cell[cellIndex + 9].IsCurrentCell = true;

                             movedCursor = true;

                      }

               }


               if (movedCursor) { this.Refresh(); }

        }
Run the application and test the arrow keys for movement.
Now let's add some
numbers.