  a C# learning space
|
Buy me a cup of coffee?
|
Let's Draw Numbers
Now that we have the basic framework of a Sudoku puzzle built and we add some navigation with mouse clicks and using the arrow keys on the keyboard, we
can focus our attention to drawing numbers onto the screen. But first let's talk a little bit about those numbers. There are large numbers and small
numbers. There are going to be two different colors of large numbers. We are going to have cells where the numbers cannot change and cells that we can
edit and cells that have no visible number, but still have a value. If a cell does not have a large number showing, it's value is zero. Keeping this
concepts in mind we can proceed.
Given & Solved Numbers
At the beginning of a puzzle there are clues that are "given". I cleverly call this type of number, Given. Then there are numbers that can be typed into
blank cells (or selected from a context menu - spoiler alert) to solve a cell. Again, I cleverly named these numbers, Solved. In order to easily see
Givens from Solved numbers, I use differnt colors for each. You could make the different fonts if you wanted. Again, you are the programmer and you do
what works for you.
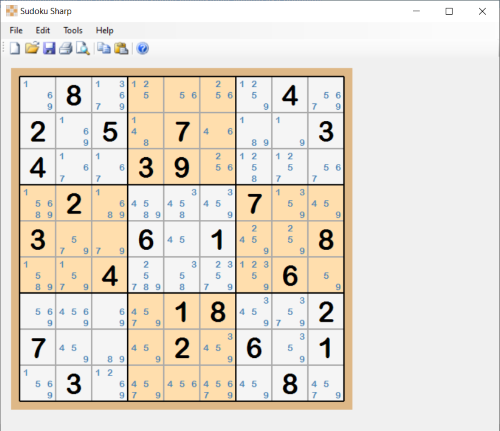
Candidates
Difficult Sudoku puzzles require that the user keeps track of possible numbers that can belong in a cell as a solution. I call these numbers, Candidates.
In Sudoku Sharp and other Sudoku programs, candidates are much smaller than Givens and Solved numbers so that you can tell they are candidates. They also
hold a specific spot in a cell. 1 is always in the upper left corner and 9 is always in the lower right corner.
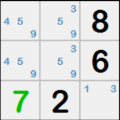
In the image below you can see Givens (black), Solved (green), and Candidates (blue).
Let's start with the large numbers. Givens in particular. Because you need to start with a given set of numbers to begin a Sudoku puzzle. Simple enough.
Either we are going to create a puzzle from scratch by designing it. Or we could start with someone else's puzzle. Like one from a newspaper or Sudoku
book, or like the page a day calendar that I have on my desk. So, first thing I want to do is to be able to highlight a cell and then type a number into
that cell.
From the
Navigation page, we built a method that recognizes when a key is let up (Form1_KeyUp). In this method we are going
to add code that will recognize the numbers, either from the number pad or from the numbered keys at the top of the keyboard. At the end of the method
add the following code. This will first test to see if the key is a number key and then set the cell's value to that number.
            // Numbers from the keyboard or number pad

            if ((e.KeyCode >= Keys.D0 && e.KeyCode <= Keys.D9) || (e.KeyCode >= Keys.NumPad0 && e.KeyCode <= Keys.NumPad9))

            {

                   string KeyValue = e.KeyCode.ToString();

                   if (KeyValue.Length == 2) { KeyValue = KeyValue.Substring(1, 1); }

                   if (KeyValue.Length == 7) { KeyValue = KeyValue.Substring(6, 1); }


                   for (int i = 0; i <= 80; i++)

                   {

                          if (Cell[i].IsActive)

                          {

                                 cellIndex = i;

                                 break;

                          }

                   }


                   if (int.Parse(KeyValue) != 0)

                   {

                          if (!Cell[cellIndex].IsGiven)

                          {

                                 Cell[cellIndex].CellValue = int.Parse(KeyValue);

                          }

                   }

                   this.Refresh();

            }
Once the cell's value is set, we need to refresh, or paint, the screen in order to show the number we just set. Add the following code in the OnPaint
event. The colors are pulled from the Settings, so you will need to add some default colors there. See
Painting The Board
for reference. We also add some new brushes and some fonts.
            // Set colors from default settings

            Color BoxBackColor = Properties.Settings.Default.Boxes;

            Color AlternateBoxColor = Properties.Settings.Default.AlternateBoxes;

            Color GridBorderColor = Properties.Settings.Default.GridBorder;

            Color GridLinesColor = Properties.Settings.Default.GridLines;

            Color ActiveCellColor = Properties.Settings.Default.ActiveCellColor;

            Color CurrentCellBorder = Properties.Settings.Default.CurrentCellBorder;

            Color GivenColor = Properties.Settings.Default.GivenColor;

            Color CandidateColor = Properties.Settings.Default.Candidates;

            Color CandidateHighlight = Properties.Settings.Default.CandidateHighlight;

            Color SolvedColor = Properties.Settings.Default.SolvedColor;


            //Create some brushes

            SolidBrush brshBackground = new SolidBrush(Color.Black);

            SolidBrush brshBorder = new SolidBrush(GridBorderColor);

            SolidBrush brshCandidate = new SolidBrush(CandidateColor);

            SolidBrush brshCandidateHighlight = new SolidBrush(CandidateHighlight);

            SolidBrush brshGivens = new SolidBrush(GivenColor);

            SolidBrush brshSolved = new SolidBrush(SolvedColor);


            // Create some fonts

            Font fntArialLarge = new Font("Arial Rounded MT Bold", 30, FontStyle.Regular);

            Font fntArialTiny = new Font("Arial Rounded MT Bold", 10, FontStyle.Regular);

            Font fntGiven = new Font("Arial Rounded MT Bold", 30, FontStyle.Regular);

            Font fntCandidate = new Font("Arial Rounded MT Bold", 10, FontStyle.Regular);
Then jump to the end of the OnPaint event and add the following code. Here is where the numbers actually get drawn on the screen. The
g.DrawString()
method in this code looks a little intimidating, but the
DrawString() method is pretty simple. It takes the string you want to place on the screen, the font,
a brush, and the X, Y coordinates of where to place it. I've added a calculation to figure out how to center the number in the cell for the X, Y coordinates.
            // Draw the givens, solved, and candidate values on the grid.

            int i = 0;

            for (row = 1; row <= 9; row++)

            {

                   for (col = 1; col <= 9; col++)

                   {

                          if (Cell[i].CellValue != 0)

                          {

                                 if (Cell[i].IsGiven)

                                 {

                                        g.DrawString(Cell[i].CellValue.ToString(), fntArialLarge, brshGivens, (Grid.xOffset + Grid.BorderWidth + ((col - 1) * (Grid.CellWidth + 1)) + 7), ((Grid.yOffset + Grid.BorderWidth + ((row - 1) * (Grid.CellHeight + 1))) + 3));

                                }

                                 else

                                 {

                                        g.DrawString(Cell[i].CellValue.ToString(), fntArialLarge, brshSolved, (Grid.xOffset + Grid.BorderWidth + ((col - 1) * (Grid.CellWidth + 1)) + 7), ((Grid.yOffset + Grid.BorderWidth + ((row - 1) * (Grid.CellHeight + 1))) + 3));

                                 }

                          }

                          i += 1;

                   }

            }
One major step that we want to perform, now that we are going to start accessing the properties of the cell object is to initialize some properties.
            private void InitializeCells()

            {

                   for (int i = 0; i <= 80; i++)

                   {

                          Cell[i] = new cell();

                          Cell[i].CellValue = 0;

                          Cell[i].Candidates = "123456789";

                          Cell[i].CandidatePattern = "000000000";

                          Cell[i].IsGiven = false;

                          Cell[i].IsActive = false;

                          Cell[i].IsCurrentCell = false;

                          Cell[i].MarkerValue = 0;

                   }

            }
Run the application and you should be able to type numbers in each of the cells. By doing this you are actually assigning the cell value to the cell from
the
Form1_KeyUp method and then painting on the screen with the OnPaint event.
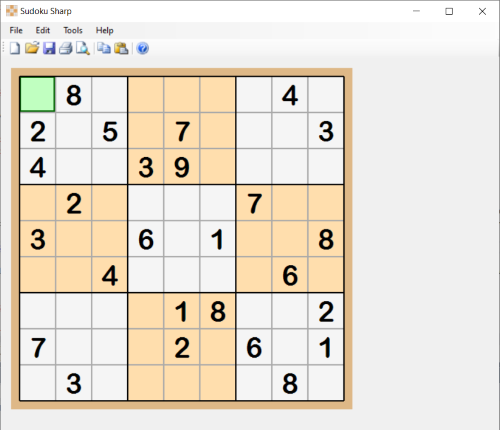
If you were to take all of the cell values starting in the upper left corner and reading left to right, top to bottom, one row at a time, you would end up
with a string of digits that is 81 characters long. This includes cells that look blank since they have the cell value of zero. This will come in handy for
the copy and paste code. Below is a string that we can use to copy and paste into our application and it is a valid Sudoku puzzle.
080000040205070003400390000020000700300601008004000060000018002700020601030000080
To do this we need to have access to the Windows clipboard. We're going to pretend for a momment that the only thing that could be on the clipboard is a
string of 81 numeric characters. Then we need to come back and test and clean up strings. Add the
PasteFromClipboard() code below to the end
of your code (or wherever makes sense to you). This code uses the
GetDataObject() to access the Windows clipboard and loads it into a string
variable which gets parsed through one character at a time and sets the cell value with the number.
            private void PasteFromClipboard()

            {

                   if (Clipboard.GetDataObject() != null)

                   {

                          string strClipboard = Clipboard.GetDataObject().GetData(DataFormats.Text).ToString();


                          for (int p = 0; p < strClipboard.Length; p++)

                          {

                                 string str = strClipboard.Substring(p, 1);


                                 Cell[p].CellValue = int.Parse(str);

                                 if (Cell[p].CellValue != 0)                 // A non-zero value should be flagged as given

                                 {

                                        Cell[p].IsGiven = true;                 // Is given

                                 }

                                 else

                                 {

                                        Cell[p].IsGiven = false;                // Empty cell

                                 }

                          }

                   }

            }
Next we need to call the Paste method from the menu item and the toolbar. From the Form1 [Design] tab, click on the Menu for Edit and then double click
on the Paste menu item. And call the Paste method from here.
            private void pasteToolStripMenuItem_Click(object sender, EventArgs e)

            {

                   PasteFromClipboard();

                   this.Refresh();

            }
And
            private void pasteToolStripButton_Click(object sender, EventArgs e)

            {

                   PasteFromClipboard();

                   this.Refresh();

            }
Test out the new pasting capabilities and you could even start solving the way the application stands. But what happens if something different is on the
clipboard when you go to paste into the puzzle. It could be disasterous. So, we need to clean up our act. Or our string.
Here is an example of what could be on the clipboard. If we remove the asterisks and pipes and periods (oh my!), we would have a valid Sudoku puzzle.
                   *-----------*

                   |19.|..5|..4|

                   |.8.|..4|3..|

                   |4..|...|.1.|

                   |---+---+---|

                   |...|.5.|9.8|

                   |.7.|...|.4.|

                   |5.3|.2.|...|

                   |---+---+---|

                   |.6.|...|..7|

                   |..7|6..|.5.|

                   |8..|7..|.29|

                   *-----------*
To clean this up and make it a string of 81 characters, I use the following series of
Replace() statements, updating the string through each
itteration.
            string strClipboard = Clipboard.GetDataObject().GetData(DataFormats.Text).ToString();

            strClipboard = strClipboard.Replace(" ", "");

            strClipboard = strClipboard.Replace("*", "");

            strClipboard = strClipboard.Replace("-", "");

            strClipboard = strClipboard.Replace("|", "");

            strClipboard = strClipboard.Replace("+", "");

            strClipboard = strClipboard.Replace("#", "");

            strClipboard = strClipboard.Replace(".", "0");

            strClipboard = strClipboard.Replace("\r\n", "");
What if there is something unknown on the clipboard; a paragraph of some text perhaps. We don't want to try pasting invalid data into a puzzle, so we have
to test whatever it is on the clipboard to see if we can, in fact, paste it into our application. After stripping out known characters from the clipboard
contents, we should only see numeric characters. If there is anything else at this point, we will reject what's on the clipboard as a valid puzzle and we
should inform the user of what is going on.
The first test I'm going to do is to make sure we have at least 81 characters left in the string from the clipboard. The bold code below is our simple
test to make sure we have enough characters to work with. The code to assign cell values is embedded within the test block of code. So if the test fails
then cell values don't get assigned and nothing gets placed on the screen.
            // Test to see if there are enough characters for a valid puzzle.

            if (strClipboard.Length >= 81)

            {

                   for (int p = 0; p < strClipboard.Length; p++)

                   {

                          string str = strClipboard.Substring(p, 1);


                          Cell[p].CellValue = int.Parse(str);

                          if (Cell[p].CellValue != 0)                 // A non-zero value should be flagged as given

                          {

                                 Cell[p].IsGiven = true;                 // Is given

                          }

                          else

                          {

                                 Cell[p].IsGiven = false;                // Empty cell

                          }

                   }

            }
The next test is to make sure all 81 characters are numeric. A single number 81 digits long is a pretty big number and too big to try converting to an int
data type, so I just step through the string one character at a time. Place the following code within the test for the number of characters. And wrap the
code for assigning values so that it will only execute if the
IsValidPuzzleString evaluates to true.
            // Test to see if there are enough characters for a valid puzzle.

            if (strClipboard.Length >= 81)

            {

                   strClipboard = strClipboard.Substring(0, 81);   // Strip off extra characters

                   bool IsValidPuzzleString = false;                             // Initialize a valid puzzle flag

                   // loop through the puzzle string for non-numeric characters

                   for (int p = 0; p < strClipboard.Length; p++)

                   {

                          string str = strClipboard.Substring(p, 1);    // Test one character at a time

                          if (int.TryParse(str, out _))                              // Test for number

                          {

                                 IsValidPuzzleString = true;

                          }

                          else

                          {

                                 // A non-numeric character should end the loop and warn the user

                                 MessageBox.Show("Clipboard does not contain a valid puzzle.", "Clipboard Error");

                                 IsValidPuzzleString = false;

                                 break;

                          }

                   }


                   if (IsValidPuzzleString)                            // Paste the valid puzzle string to each cell value

                   {

                          int intCellsGiven = 0;

                          for (int p = 0; p < strClipboard.Length; p++)

                          {

                                 string str = strClipboard.Substring(p, 1);


                                 Cell[p].CellValue = int.Parse(str);

                                 if (Cell[p].CellValue != 0)                 // A non-zero value should be flagged as given

                                 {

                                        Cell[p].IsGiven = true;                 // Is given

                                        intCellsGiven += 1;

                                 }

                                 else

                                 {

                                        Cell[p].IsGiven = false;                // Empty cell

                                 }

                          }

                   }

            }
At this point you can copy the string from above and paste it into the application and then solve the puzzle. We don't have the capability to Undo any
mistakes, but you can type over a cell value as long as it is not a given value. But the fact remains that there is room for mistakes. We'll get to
the Undo and Redo programming in a bit. But first, we need to take care of putting Candidates on the board.
Before we put a candidate within a cell, we need to know if it should be there or not. In other words, you have candidates that are disqualified as a
possible solution to the cell and therefore should not be drawn to the screen. Which means we not only need a method for drawing the numbers on the screen
we need to have a way to maintain the candidates as the puzzle progresses towards a solution. That means, any changes to cells affect the candidates need
to get updated. Whether it's solving a cell, undoing, redoing, or disqualifying a candidate
To handle this, I have made one method that updates (or sets) the candidates and then there are many places with the application where the
SetCellCandidates
is called.
Before we look at the code, let's talk about a couple of things. The
SetCellCandidates deals with a couple of strings one is to maintain
which candidates are put on the screen;
Cell[].Candidates. And a bit pattern of 0s and 1s to tell if a particular candidate is valid (1) or
disqualified (0);
Cell[].CandidatePattern. The Candidate Pattern will be used in solving later on. Just put it on the back burner for now.
Cell[].Candidates is a string that can be 0 to 9 digits long. If the length is 0, then that cell should have a cell value between 1 & 9 and it
is either a given value or a solved cell. This is our first test. If the cell is solved or given, we set the Candidate string to nothing and we set the
Candidate Pattern to all zeros (000000000). Cells that have a cell value of 0 should have a string of candidates from 1 to 9 digits long. This is where we
have to set the possible candidates. As candidates are eliminated, the candidates string gets shorter. We use the concept of Peers in this method quite
a bit.
With a cell value that is zero, we test to see if the Peer exists so we don't get an error while trying to access it. If it doesn't exist, we run the
AssignCellPeers() method and then extract the
Cell[].Peer string into a row, col, & box ID. Then it checks each cell within
the row for a non-zero cell value and then removes that value as a candidate from all of the cells within that row. Then we rinse and repeat for each
column and each box. Then based on the candidates we just set, we then set the candidate pattern.
            public void SetCellCandidates()

            {

                   for (int i = 0; i <= 80; i++)

                   {

                          if (Cell[i].CellValue != 0)  // Cell is either solved or given and has no candidates

                          {

                                 Cell[i].Candidates = "";

                                 Cell[i].CandidatePattern = "000000000";

                          }

                          else

                          {

                                 if (Cell[i].Peer == null)

                                 {

                                        AssignCellPeers();

                                 }

                                 // Extract the row, col, and box IDs from the cell peer value.

                                 int rowID = int.Parse(Cell[i].Peer.Substring(0, 1));

                                 int colID = int.Parse(Cell[i].Peer.Substring(1, 1));

                                 int boxID = int.Parse(Cell[i].Peer.Substring(2, 1));

                                 int rowPeer = 0;

                                 int colPeer = 0;

                                 int boxPeer = 0;

                                 // Removes candidates from peer cells where a non-zero cell value exists within the row.

                                 for (int x = 1; x <= 9; x++)

                                 {

                                        rowPeer = ((rowID * 9) - 10) + x;

                                        if (Cell[rowPeer].CellValue != 0)

                                        {

                                               Cell[i].Candidates = Cell[i].Candidates.Replace(Cell[rowPeer].CellValue.ToString(), "");

                                        }

                                 }

                                 // Removes cadidates from peer cells where a non-zero cell value exists within a column.

                                 for (int x = 1; x <= 9; x++)

                                 {

                                        colPeer = (colID - 1) + (x * 9) - 9;

                                        if (Cell[colPeer].CellValue != 0)

                                        {

                                               Cell[i].Candidates = Cell[i].Candidates.Replace(Cell[colPeer].CellValue.ToString(), "");

                                        }

                                 }

                                 // Removes candidates from peer cells where a non-zero cell value exists within a box.

                                 for (int row = 1; row <= 9; row += 3)

                                 {

                                        for (int col = 1; col <= 9; col += 3)

                                        {

                                               for (int rowModifier = 0; rowModifier <= 2; rowModifier++)

                                               {

                                                      for (int colModifier = 0; colModifier <= 2; colModifier++)

                                                      {

                                                             boxPeer = ((col + colModifier) - 1) + (((row + rowModifier) - 1) * 9);

                                                             if (Cell[boxPeer].Peer.Substring(2, 1) == boxID.ToString())

                                                             {

                                                                    if (Cell[boxPeer].CellValue != 0)

                                                                    {

                                                                           Cell[i].Candidates = Cell[i].Candidates.Replace(Cell[boxPeer].CellValue.ToString(), "");

                                                                    }

                                                             }

                                                      }

                                               }

                                        }

                                 }

                                 // Set candidate pattern string for use in solving.

                                 if (Cell[i].Candidates != null)

                                 {

                                        Cell[i].CandidatePattern = "";

                                        for (int x = 1; x <= 9; x++)

                                        {

                                               if (Cell[i].Candidates.Contains(x.ToString()))

                                               {

                                                      Cell[i].CandidatePattern += "1";

                                               }

                                               else

                                               {

                                                      Cell[i].CandidatePattern += "0";

                                               }

                                        }

                                 }

                          }

                   }

            }
With the
SetCellCandidates() code in place, we need to call it. The first place we're going to call it is in the
Form1_Load().
            private void Form1_Load(object sender, EventArgs e)

            {

                   Cell[0].IsActive = true;

                   AssignCellPeers();

                   SetCellCandidates();

                   this.Invalidate();

            }
In the
Form1_KeyUp method, find the code towards the end and add the
SetCandidates(); call. This will update the candidates
as you solve cells.
            if (int.Parse(KeyValue) != 0)

            {

                   if (!Cell[cellIndex].IsGiven)

                   {

                          Cell[cellIndex].CellValue = int.Parse(KeyValue);

                          SetCellCandidates();

                   }

            }
We need to add some code to our Show Candidates menu item under the Tools menu. Click over to the Design tab and click on the Tools menu and then double
click on the Show Candidates menu item and add the following code.
            private void showCandidatesToolStripMenuItem_Click(object sender, EventArgs e)

            {

                   if (Grid.ShowCandidates)

                   {

                          Grid.ShowCandidates = false;

                          showCandidatesToolStripMenuItem.Checked = false;

                   }

                   else

                   {

                          Grid.ShowCandidates = true;

                          showCandidatesToolStripMenuItem.Checked = true;


                   }

                   this.Refresh();

            }
Run the application, paste a puzzle into the application, click on the Tools and Show Candidates menu item. You should see something like the image below.
Try entering some numbers and make sure your code is updating the candidates within the peer cells.
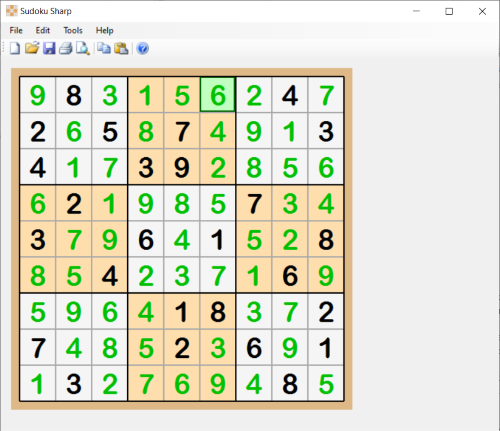
For those of you that would like to try the puzzle, but get stuck, here's the solution.
That's all I want to cover with regards to painting/drawing numbers on the screen for now. It's time to move on to
Strategic
Highlighting. This will aid in solving puzzles.