  a C# learning space
|
Buy me a cup of coffee?
|
Cutsomize the Board
One of the great things about being the programmer is that you get to make the interface custom to your liking. As a user it would be nice to be able to
change things up if you don't like a particular color. That's why I wanted to add the customizing feature where the user can change certain aspects of the
interface to something that they enjoy. The application needs to be able to remember when a user changes preferences and that can be done in a configuration
file or it can be done in the application itself. I chose the latter. That's why we set up some colors in the settings of the application. When the
application is closed, the current settings are saved and then loaded when the application starts again.
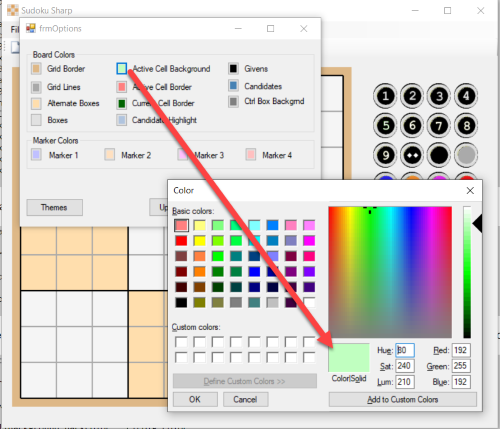
Below is a screenshot of the Options form I've added to be able to configure the user interface colors to whatever the user wants.

In order to make the form appear, the user would go to Tools > Color Options in the menu. To make that work go to the main form design screen and click the Tools
menu item and then double click on the Options. This will take you back to the code screen and create the shell code to add functionality to the menu item
click method. Within the shell code create a new istance of the frmOptions object and add the code to show the form as seen below.
            private void colorOptionsToolStripMenuItem_Click(object sender, EventArgs e)

            {

                   frmOptions OptionsForm = new frmOptions();

                   OptionsForm.ShowDialog();

            }
In the FormLoad event, I am loading the colors from the Settings.settings as the default colors. You may remember Settings.settings from Painting the Board.
If not you should revisit those instructions and set up any colors that you want your users to be able to set and keep from one session to the next.
The code below shows how to load those colors from Settings.settings. What this does is it loads the default (or user preferred) colors into the buttons
on the Options form. When the user clicks on one of the buttons it will open the color picker to set the color and then saving the options will write
to the Settings.settings for the default colors that have changed.
            private void frmOptions_Load(object sender, EventArgs e)

            {

                   btnActiveCellBackground.BackColor = Properties.Settings.Default.ActiveCellColor;

                   btnActiveCellBorder.BackColor = Properties.Settings.Default.ActiveCellBorder;

                   btnCurrentCellBorder.BackColor = Properties.Settings.Default.CurrentCellBorder;

                   btnAlternateBoxes.BackColor = Properties.Settings.Default.AlternateBoxes;

                   btnGridBorder.BackColor = Properties.Settings.Default.GridBorder;

                   btnGridLines.BackColor = Properties.Settings.Default.GridLines;

                   btnCandidates.BackColor = Properties.Settings.Default.Candidates;

                   btnCandHighlight.BackColor = Properties.Settings.Default.CandidateHighlight;

                   btnGivens.BackColor = Properties.Settings.Default.GivenColor;

                   btnCtrlBox.BackColor = Properties.Settings.Default.ControlBoxBkgrd;

                   btnMarker1.BackColor = Properties.Settings.Default.Marker1;

                   btnMarker2.BackColor = Properties.Settings.Default.Marker2;

                   btnMarker3.BackColor = Properties.Settings.Default.Marker3;

                   btnMarker4.BackColor = Properties.Settings.Default.Marker4;

            }
First, I want to create an instance of the color dialog that is the color picker.
            public partial class frmOptions : Form

            {

                   ColorDialog clrDlg = new ColorDialog();


                   public frmOptions()

                   {

                          InitializeComponent();

                   }
In order to be able to change the color for a given button, the click event needs a little code. Double click the button to create the shell for the click
event and add the following code.
            private void btnActiveCellBackground_Click(object sender, EventArgs e)

            {

                   clrDlg.AnyColor = true;

                   clrDlg.Color = Properties.Settings.Default.ActiveCellColor;

                   if (clrDlg.ShowDialog() == DialogResult.OK)

                   {

                          btnActiveCellBackground.BackColor = clrDlg.Color;

                   }

            }
Then repeat this step for each button, using the proper default setting for each button. Then the next time the form is refreshed the new color(s)
take effect.
Next, let's handle the Update and Cancel buttons. Double click each button to create the shell and add the following code. The Update code takes the
current BackColor from each button and sets the default color in Settings.settings and then closes the Options form. The Cancel code just closes the
form without saving anything.
            private void btnUpdate_Click(object sender, EventArgs e)

            {

                   Properties.Settings.Default.ActiveCellColor = btnActiveCellBackground.BackColor;

                   Properties.Settings.Default.ActiveCellBorder = btnActiveCellBorder.BackColor;

                   Properties.Settings.Default.CurrentCellBorder = btnCurrentCellBorder.BackColor;

                   Properties.Settings.Default.AlternateBoxes = btnAlternateBoxes.BackColor;

                   Properties.Settings.Default.Boxes = btnBoxes.BackColor;

                   Properties.Settings.Default.GridBorder = btnGridBorder.BackColor;

                   Properties.Settings.Default.GridLines = btnGridLines.BackColor;

                   Properties.Settings.Default.GivenColor = btnGivens.BackColor;

                   Properties.Settings.Default.Candidates = btnCandidates.BackColor;

                   Properties.Settings.Default.CandidateHighlight = btnCandHighlight.BackColor;

                   Properties.Settings.Default.ControlBoxBkgrd = btnCtrlBox.BackColor;

                   Properties.Settings.Default.Marker1 = btnMarker1.BackColor;

                   Properties.Settings.Default.Marker2 = btnMarker2.BackColor;

                   Properties.Settings.Default.Marker3 = btnMarker3.BackColor;

                   Properties.Settings.Default.Marker4 = btnMarker4.BackColor;

                   Properties.Settings.Default.Save();

                   this.Close();

            }


            private void btnCancel_Click(object sender, EventArgs e)

            {

                   this.Close();

            }
Loaded with this information you can create themes by having set colors for each of the settings and then create a new form with the different themes.
When the user goes to save the form, each of the default settings gets changed to the theme. You could even create a custom theme using this kind of
logic.
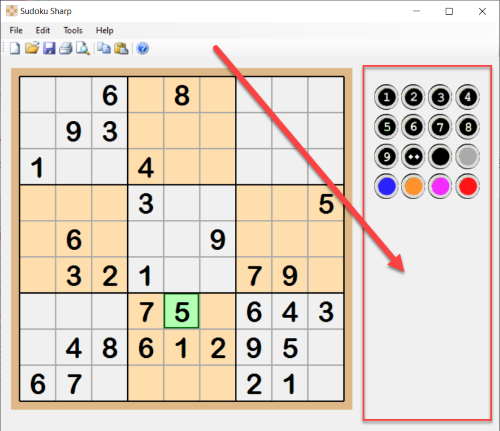
As you can see the current state of the form has a bit of unused real estate. Let's do something about that.
First, I add the color from the default settings in the OnPaint event.
            Color Marker1Color = Properties.Settings.Default.Marker1;

            Color Marker2Color = Properties.Settings.Default.Marker2;

            Color Marker3Color = Properties.Settings.Default.Marker3;

            Color Marker4Color = Properties.Settings.Default.Marker4;

            Color CtrlBoxBG = Properties.Settings.Default.ControlBoxBkgrd;
And I need a brush for that color.
            SolidBrush brshCandidateHighlight = new SolidBrush(CandidateHighlight);

            SolidBrush brshGivens = new SolidBrush(GivenColor);

            SolidBrush brshSolved = new SolidBrush(SolvedColor);

            SolidBrush brshCtrlBox = new SolidBrush(CtrlBoxBG);
Next, I add a bit of code to draw some rectangles with different colors to form a border around the control buttons. If your images look square, you
may want to make the background transparent. Then change the BackColor of each image to Transparent by clicking on the elipsis for BackColor click the Web
tab and then Transparent. The default BackColor is set to Control.
            // Creating Graphics allows drawing on the form

            Graphics g = e.Graphics;


            //Draw the control box

            int xCtrlBoxOrigin = ((Grid.CellWidth + 1) * 9) + Grid.xOffset + Grid.BorderWidth;

            int yCtrlBoxOrigin = Grid.yOffset;

            //Border

            g.FillRectangle(brshBorder, xCtrlBoxOrigin + 20, yCtrlBoxOrigin, 190, 200);

            //Inner Field

            g.FillRectangle(brshCtrlBox, xCtrlBoxOrigin + 33, yCtrlBoxOrigin + 14, 164, 174);

            g.DrawRectangle(penThickBlack, xCtrlBoxOrigin + 33, yCtrlBoxOrigin + 14, 164, 174);
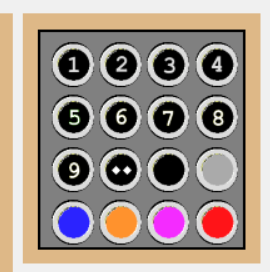
Then I add some highlights to the control box and then repeat for a second and third control box.
            //Add highlighting to control box border

			int CBBorderLength, CBBorderHeight;  //, CBBorderInnerLength, CBBorderInnerHeight;

			CBBorderLength = 170;

			CBBorderHeight = 180;

			g.DrawLine(penThickLhtBrown, xCtrlBoxOrigin + 22, yCtrlBoxOrigin + 2, CBBorderLength + 525, yCtrlBoxOrigin + 2);

			g.DrawLine(penThickLhtBrown, xCtrlBoxOrigin + 22, yCtrlBoxOrigin + 2, xCtrlBoxOrigin + 22, CBBorderHeight + 82);

			g.DrawLine(penThickLhtBrown, CBBorderLength + 516, yCtrlBoxOrigin + 11, CBBorderLength + 516, CBBorderHeight + 76);

			g.DrawLine(penThickLhtBrown, xCtrlBoxOrigin + 30, yCtrlBoxOrigin + 190, CBBorderLength + 516, CBBorderHeight + 76);

			g.DrawLine(penThickDrkBrown, xCtrlBoxOrigin + 30, yCtrlBoxOrigin + 11, CBBorderLength + 515, yCtrlBoxOrigin + 11);

			g.DrawLine(penThickDrkBrown, xCtrlBoxOrigin + 30, yCtrlBoxOrigin + 11, xCtrlBoxOrigin + 30, CBBorderHeight + 76);

			g.DrawLine(penThickDrkBrown, CBBorderLength + 524, yCtrlBoxOrigin + 2, CBBorderLength + 524, CBBorderHeight + 82);

			g.DrawLine(penThickDrkBrown, xCtrlBoxOrigin + 22, yCtrlBoxOrigin + 198, CBBorderLength + 524, CBBorderHeight + 82);


			//Draw second control box

			int xCtrlBox2Origin = ((grid.CellWidth + 1) * 9) + grid.xOffset + grid.BorderWidth;

			int yCtrlBox2Origin = grid.yOffset + 210;

			//Border

			g.FillRectangle(brshBorder, xCtrlBox2Origin + 20, yCtrlBox2Origin, 190, 273);

			//Inner Field

			g.FillRectangle(brshCtrlBox, xCtrlBox2Origin + 33, yCtrlBox2Origin + 14, 164, 115);

			g.DrawRectangle(penThickBlack, xCtrlBox2Origin + 33, yCtrlBox2Origin + 14, 164, 115);

            //Add highlighting to control box border

            int CB2BorderLength, CB2BorderHeight;

            CB2BorderLength = 170;

            CB2BorderHeight = 180;

            g.DrawLine(penThickLhtBrown, xCtrlBoxOrigin + 22, yCtrlBoxOrigin + 212, CB2BorderLength + 525, yCtrlBoxOrigin + 212);

            g.DrawLine(penThickLhtBrown, xCtrlBoxOrigin + 22, yCtrlBoxOrigin + 212, xCtrlBoxOrigin + 22, CB2BorderHeight + 365);

            g.DrawLine(penThickLhtBrown, CB2BorderLength + 516, yCtrlBoxOrigin + 221, CB2BorderLength + 516, CB2BorderHeight + 228);

            g.DrawLine(penThickLhtBrown, xCtrlBoxOrigin + 30, yCtrlBoxOrigin + 341, CB2BorderLength + 516, CB2BorderHeight + 227);

            g.DrawLine(penThickDrkBrown, xCtrlBoxOrigin + 30, yCtrlBoxOrigin + 221, CB2BorderLength + 515, yCtrlBoxOrigin + 221);

            g.DrawLine(penThickDrkBrown, xCtrlBoxOrigin + 30, yCtrlBoxOrigin + 221, xCtrlBoxOrigin + 30, CB2BorderHeight + 227);

            g.DrawLine(penThickDrkBrown, CB2BorderLength + 524, yCtrlBoxOrigin + 212, CB2BorderLength + 524, CB2BorderHeight + 365);

            g.DrawLine(penThickDrkBrown, xCtrlBoxOrigin + 22, yCtrlBoxOrigin + 480, CB2BorderLength + 524, CB2BorderHeight + 366);


            //Draw third control box

            int xCtrlBox3Origin = ((grid.CellWidth + 1) * 9) + grid.xOffset + grid.BorderWidth;

			int yCtrlBox3Origin = grid.yOffset + 350;

			//Inner Field

			g.FillRectangle(brshCtrlBox, xCtrlBox3Origin + 33, yCtrlBox3Origin + 14, 164, 106);

			g.DrawRectangle(penThickBlack, xCtrlBox3Origin + 33, yCtrlBox3Origin + 14, 164, 106);

            //Add highlighting to control box border

            int CB3BorderLength, CB3BorderHeight;

            CB3BorderLength = 170;

            CB3BorderHeight = 180;

            g.DrawLine(penThickLhtBrown, CB3BorderLength + 516, yCtrlBoxOrigin + 362, CB3BorderLength + 516, CB3BorderHeight + 357);

            g.DrawLine(penThickLhtBrown, xCtrlBoxOrigin + 30, yCtrlBoxOrigin + 472, CB3BorderLength + 516, CB3BorderHeight + 357);

            g.DrawLine(penThickDrkBrown, xCtrlBoxOrigin + 30, yCtrlBoxOrigin + 361, CB3BorderLength + 515, yCtrlBoxOrigin + 361);

            g.DrawLine(penThickDrkBrown, xCtrlBoxOrigin + 30, yCtrlBoxOrigin + 361, xCtrlBoxOrigin + 30, CB3BorderHeight + 357);
Next, I add some functionality to the application in the form of a few buttons to restart, solve, or close the puzzle/application. Because we are drawing
on the form, you may need to play around with the positioning of the buttons so that they look good when the applicaiton is running.

The first button allows us to restart the puzzle from the beginning. It simply loops through the puzzle either clearing each cell or keeping the
given clues. Then it resets the candidates for each cell, which we already have a method for (SetCellCandidates). And I'll clear out any highlighting
that might be used currently. Meaning, if the user had all of the possible ones highlighted, this would reset that like they started a new puzzle.
            private void NewPuzzleClearHighLt()

            {

                   Grid.HighlightedCells = 0;

                   UpdateButtons();

            }


            private void btnRestartPuzzle_Click(object sender, EventArgs e)

            {

                   DialogResult dlgResult = MessageBox.Show("Are you sure you want to restart the current puzzle?", "Restart Current Puzzle", MessageBoxButtons.OKCancel);

                   if (dlgResult == DialogResult.OK)

                   {

                          for (int x = 0; x <= 80; x++)

                          {

                                 if (!Cell[x].IsGiven)

                                 {

                                        Cell[x].CellValue = 0;

                                        Cell[x].Candidates = "123456789";

                                 }

                          }

                          SetCellCandidates();

                          NewPuzzleClearHighLt();

                          this.Refresh();

                   }

            }
The next button will solve the puzzle. The way I programmed it, it uses the same kind of logic that a person might use to solve a Sudoku puzzle rather
than just guessing at the numbers until it's solved. Using the guessing method is called backtracking. The method just keeps guessing at numbers until it
finds itself going in the wrong direction and then backing up and guessing again and repeating this process until the puzzle is solved. Any good Sudoku
puzzle can be solved using logic, even the really tough ones. So, I've written some methods that use that logic to eliminate possiblilities to find the
solution. I've found that most puzzles, even the hard ones published in newspapers and Sudoku books can be solved using the simplest of logic. If you have
to get beyond Hidden Triples, you have a pretty hard puzzle. Rarely will you find published puzzles that require strategies like X-Wing or Swordfish to
be solved.
That being said, the easiest way to solve a Sudoku puzzle programmatically is to solve cells using the easiest strategy until you can no longer solve using
that strategy or the entire puzzle is already solved. If it is not solved, then try the next strategy and repeat the process until the puzzle is solved.
To do that, I set up a series of nested Do/While loops. One for each strategy. The innermost loop being the easiest strategy and then working out to more
difficult strategies. To see what the different strategies are, see the
Strategies page